Extracting data from websites has become essential in various fields, from data collection to competitive analysis. Traditional web scraping methods often involve loading a full browser, which can consume significant resources and time due to rendering UI elements like toolbars and buttons. This is where headless browser automation tools, like Puppeteer, come in.
In this detailed blog, we'll dive into how to use Puppeteer for web scraping. We'll explore its advantages, scraping single and multiple pages, error handling, button clicks, form submissions, and crucial techniques like leveraging request headers and proxies to bypass detection. Additionally, why web scraping APIs are the best options for efficient large-scale scraping.
Why Use Puppeteer for Web Scraping
Puppeteer is a browser automation tool that allows developers to programmatically control a browser through a high-level API, leveraging the DevTools Protocol.
Effortlessly integrate web scraping into your Node.js projects with HasData's Node.js SDK, leveraging headless browsers, proxy rotation, and JavaScript rendering…
The Google SERP API library is a comprehensive solution that allows developers to integrate Google Search Engine Results Page (SERP) data. It provides a simplified…
Browser Control
Puppeteer offers sophisticated control over browser actions, enabling interaction with elements such as buttons and forms, scrolling pages, and capabilities like capturing screenshots or executing custom JavaScript.
Headless Browser Support
By default, Puppeteer operates in headless mode, which means running without a graphical interface that increases speed and memory efficiency. However, it can also be configured to run in a full ("headful") Chrome/Chromium window. It uses the Chromium browser by default, but can also be configured to use Chrome or Firefox with the unofficial libraries.
Robust API
Puppeteer provides a high-level API for seamless control and interaction with web pages via code, enabling element interaction, webpage manipulation, and navigation across pages.
Intercepting Network Requests
Puppeteer offers advanced features, like intercepting and modifying network requests. You can view the details of each request, such as the URL, headers, and body, and analyze the responses. This functionality enables dynamic content extraction and modifying API responses.
Ease of Use
Puppeteer is well-known for its flexibility and user-friendly nature. It simplifies web scraping and automation tasks, making it accessible even to developers with minimal experience in these domains.
Preparing the Environment
Before we dive into scraping, let's prep our environment. Download and install Node.js from the official site if you haven't already. Then, please create a new directory for your project, navigate to it, and initialize a Node.js project by running npm init. The npm init -y command creates a package.json file with all the dependencies.
mkdir puppeteer-scraping
cd puppeteer-scraping
npm init -y
Now, you can install Puppeteer using NPM (Node Package Manager). Here's how to install Puppeteer using NPM: navigate to your project directory using the cd command and run the following command:
npm install puppeteerThis command will download and add Puppeteer as a dependency to your project and a dedicated browser it uses (Chromium).
This is how the complete process looks:
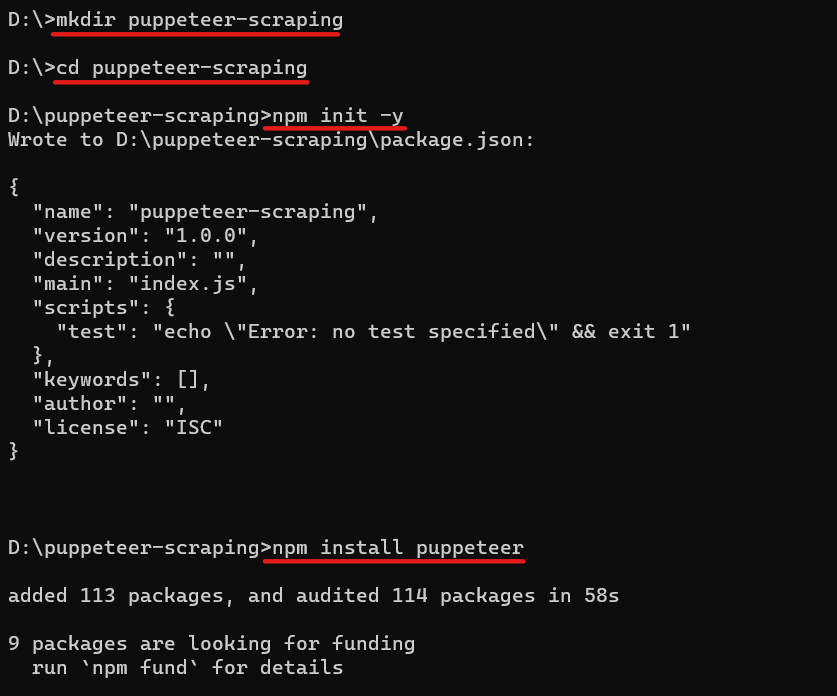
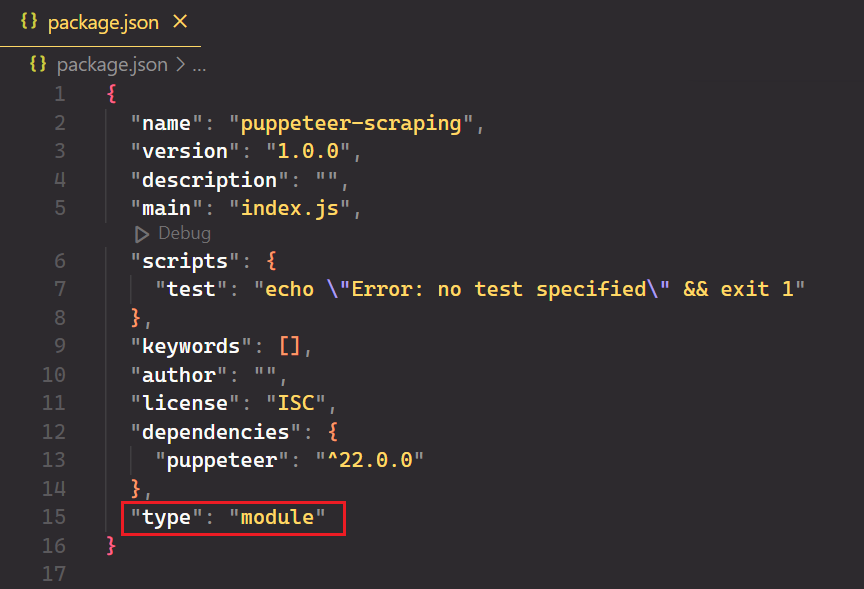
Open the project in your preferred code editor and create a new file named index.js. Finally, open the package.json file and add "type": "module" to support modern JavaScript syntax.
Scraping Basics with Puppeteer
Now that your environment is set up, let's dive into some basic web scraping with Puppeteer. You can do everything you normally do manually in the browser, from generating screenshots to crawling multiple pages.
Selecting Data to Scrape
We'll be extracting data from GitHub topics. This will allow you to select the topic and the number of repositories you want to extract. The scraper will then return the information associated with the chosen topic.
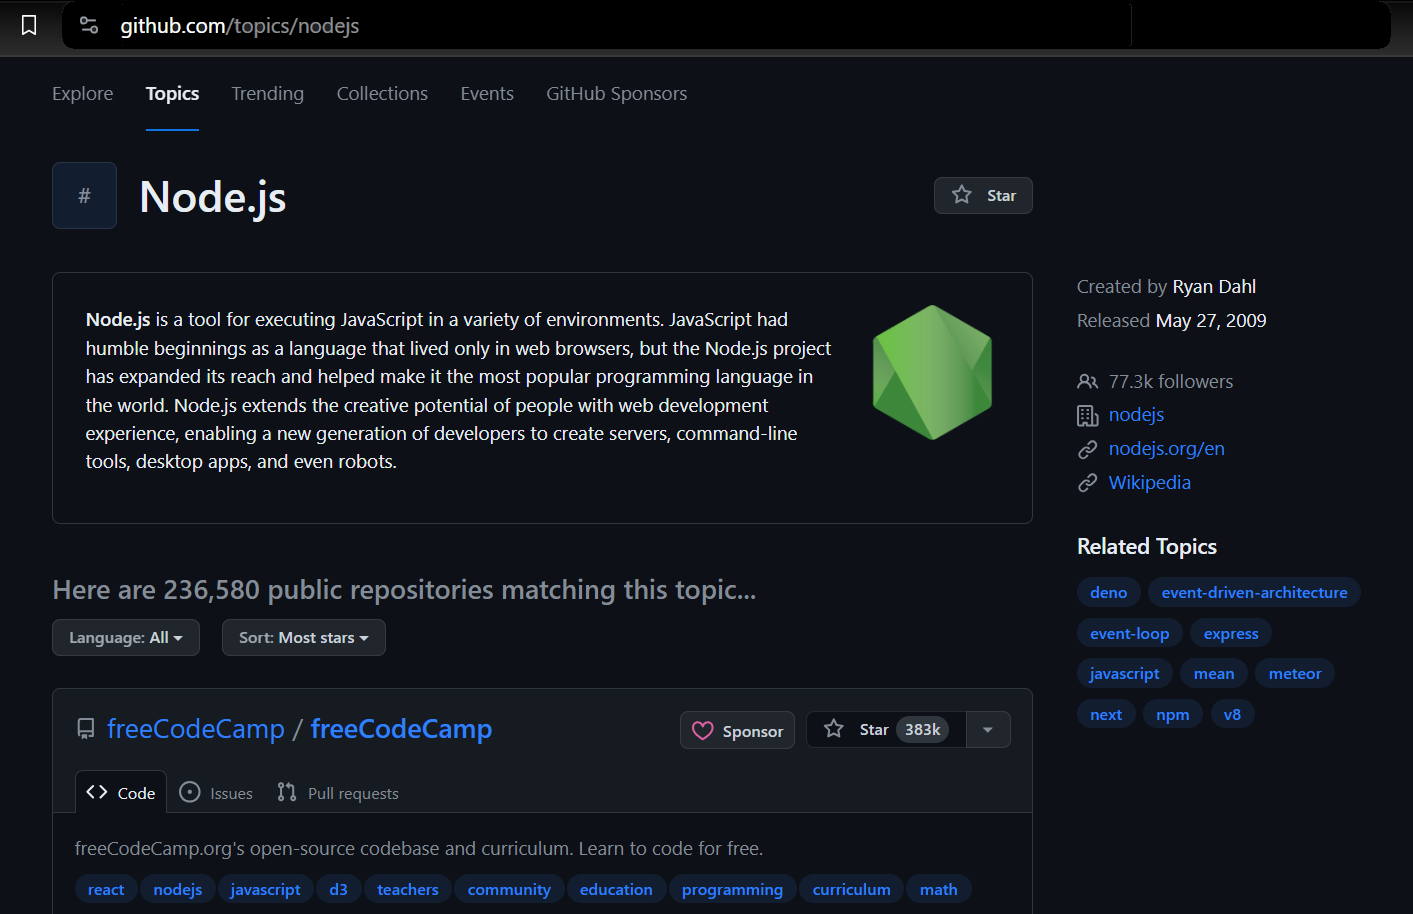
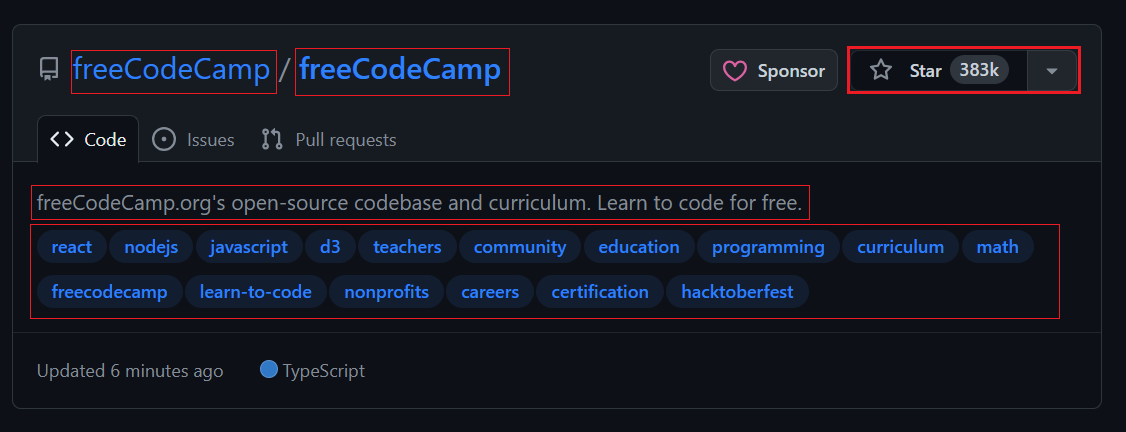
We’ll use Puppeteer to launch a browser, navigate to the GitHub topics page, and extract the necessary information. This includes details such as the repository owner, repository name, repository URL, the number of stars the repository has, its description, and any associated tags.
Navigating to a Page
To start, you must open a new browser window using Puppeteer and visit a specific URL. In the code snippet below, the puppeteer.launch() function launches a new browser instance and browser.newPage() creates a new page within that instance. The page.goto() function then navigates to the specified URL.
import puppeteer from "puppeteer";

const browser = await puppeteer.launch({
    headless: true,
    defaultViewport: null
});
const page = await browser.newPage();

await page.goto('<https://github.com/topics/nodejs>');
Screenshot Capture of Web Pages
Puppeteer lets you capture screenshots of web pages. This feature is valuable for visual verification, as it allows you to capture the snapshot at any point in time.
import puppeteer from "puppeteer";

const browser = await puppeteer.launch({
    headless: true,
    defaultViewport: null
});
const page = await browser.newPage();

await page.goto('<https://github.com/topics/nodejs>');

await page.screenshot({ path: 'Images/screenshot.png' });

await browser.close();
To capture the entire page, set the fullPage property to true. You can also change the image format to jpg or jpeg for saving in different formats.
await page.screenshot({ path: 'Images/screenshot.jpg', fullPage: true });Scraping Single Page
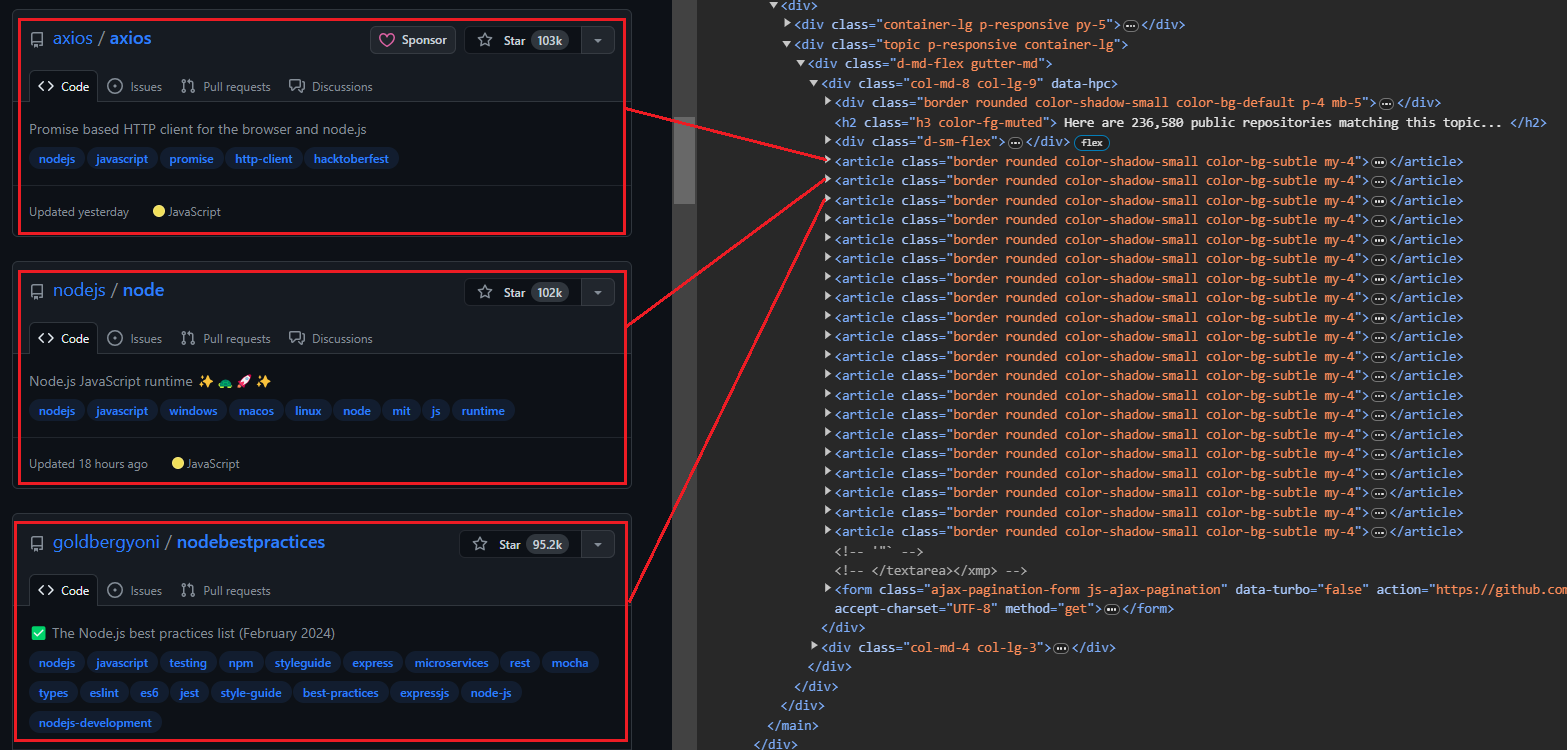
When you open the topic page, you’ll see 20 repositories. Each entry, shown as an <article> element, displays information about a specific repository. You can expand each element to view more detailed information about the corresponding repository.
The image below shows an expanded <article> element, displaying all the information about the repository.
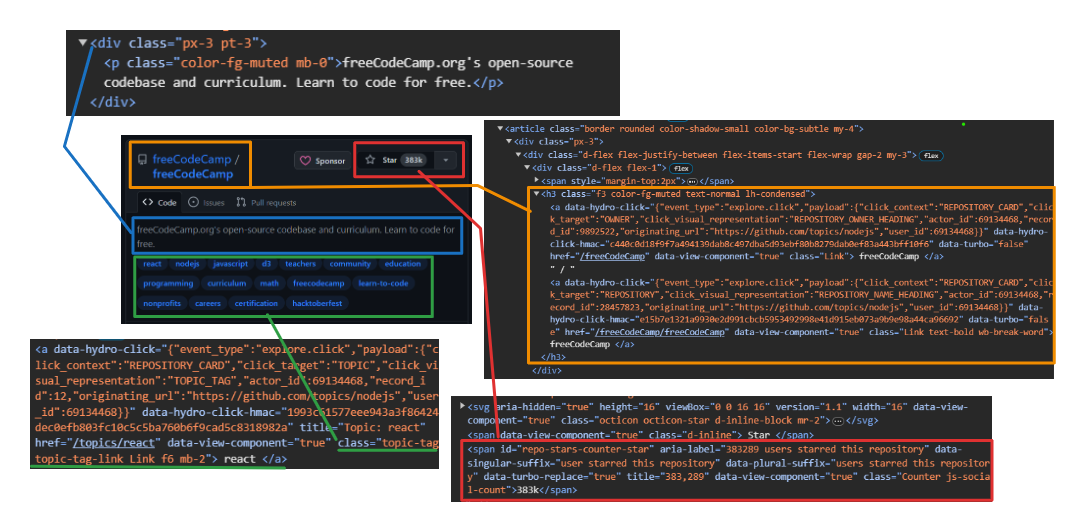
Extracting User and Repository Information:
- User: Use
h3 > a:first-childto target the first anchor tag directly within a<h3>tag. - Repository Name: Target the second child element within the same
<h3>parent. This child holds both the name and URL. Use thetextContentproperty to extract the name and thegetAttribute('href')method to extract the URL. - Number of Stars: Use
#repo-stars-counter-starto select the element and extract the actual number from itstitleattribute. - Repository Description: Use
div.px-3 > pto select the first paragraph within adivwith the classpx-3. - Repository Tags: Use
a.topic-tagto select all anchor tags with the classtopic-tag.
Effortlessly integrate web scraping into your Node.js projects with HasData's Node.js SDK, leveraging headless browsers, proxy rotation, and JavaScript rendering…
The Google SERP API library is a comprehensive solution that allows developers to integrate Google Search Engine Results Page (SERP) data. It provides a simplified…
The querySelector selects the first element matching a specific CSS selector within a document or element whereas querySelectorAll selects all elements matching a selector.
Here’s a code snippet:
repos.forEach(repo => {
    const user = repo.querySelector('h3 > a:first-child').textContent.trim();
    const repoLink = repo.querySelector('h3 > a:nth-child(2)');
    const repoName = repoLink.textContent.trim();
    const repoUrl = repoLink.getAttribute('href');
    const repoStar = repo.querySelector('#repo-stars-counter-star').getAttribute('title');
    const repoDescription = repo.querySelector('div.px-3 > p').textContent.trim();
    const tagsElements = Array.from(repo.querySelectorAll('a.topic-tag'));
    const tags = tagsElements.map(tag => tag.textContent.trim());
});
Let’s have a look at the complete process for extracting all repositories from a single page.
The process begins with the page.evaluate method, which executes JavaScript on the page. This is useful for scraping data without downloading the entire HTML content. We'll define all variables and selectors within this method.
const repos = await page.evaluate(() => { ... });Then selects all elements with the class border within the article tag and converts them into an array called repos. Also, create an empty array called repoData to store the extracted information.
const repos = Array.from(document.querySelectorAll('article.border'));
const repoData = [];
Iterates through each element in the repos array to extract all relevant data for each repository using the provided selectors.
repos.forEach(repo => { ... });Finally, the extracted data for each repository is added to the repoData array, and the array is returned.
repoData.push({ user, repoName, repoStar, repoDescription, tags, repoUrl });Here’s the code for all the above steps.
const extractedRepos = await page.evaluate(() => {
    const repos = Array.from(document.querySelectorAll('article.border'));
    const repoData = [];
    repos.forEach(repo => {
        const user = repo.querySelector('h3 > a:first-child').textContent.trim();
        const repoLink = repo.querySelector('h3 > a:nth-child(2)');
        const repoName = repoLink.textContent.trim();
        const repoUrl = repoLink.getAttribute('href');
        const repoStar = repo.querySelector('#repo-stars-counter-star').getAttribute('title');
        const repoDescription = repo.querySelector('div.px-3 > p').textContent.trim();
        const tagsElements = Array.from(repo.querySelectorAll('a.topic-tag'));
        const tags = tagsElements.map(tag => tag.textContent.trim());

        repoData.push({ user, repoName, repoStar, repoDescription, tags, repoUrl });
    });
    return repoData;
});
Here’s the complete code. With this code, you can easily collect data from a single page. Just run it and enjoy the results!
// Import the Puppeteer library
import puppeteer from "puppeteer";

(async () => {
    // Launch a headless browser
    const browser = await puppeteer.launch({ headless: true });

    // Open a new page
    const page = await browser.newPage();

    // Navigate to the Node.js topic page on GitHub
    await page.goto('<https://github.com/topics/nodejs>');

    const extractedRepos = await page.evaluate(() => {
        // Select all repository elements
        const repos = Array.from(document.querySelectorAll('article.border'));

        // Create an empty array to store extracted data
        const repoData = [];

        // Loop through each repository element
        repos.forEach(repo => {
            // Extract specific details from the repository element
            const user = repo.querySelector('h3 > a:first-child').textContent.trim();
            const repoLink = repo.querySelector('h3 > a:nth-child(2)');
            const repoName = repoLink.textContent.trim();
            const repoUrl = repoLink.getAttribute('href');
            const repoStar = repo.querySelector('#repo-stars-counter-star').getAttribute('title');
            const repoDescription = repo.querySelector('div.px-3 > p').textContent.trim();
            const tagsElements = Array.from(repo.querySelectorAll('a.topic-tag'));
            const tags = tagsElements.map(tag => tag.textContent.trim());

            // Add extracted data to the main array
            repoData.push({ user, repoName, repoStar, repoDescription, tags, repoUrl });
        });

        // Return the extracted data
        return repoData;
    });

    console.log(`We extracted ${extractedRepos.length} repositories.\\n`);

    // Print the extracted data to the console
    console.dir(extractedRepos, { depth: null }); // Show all nested data

    // Close the browser
    await browser.close();
})();
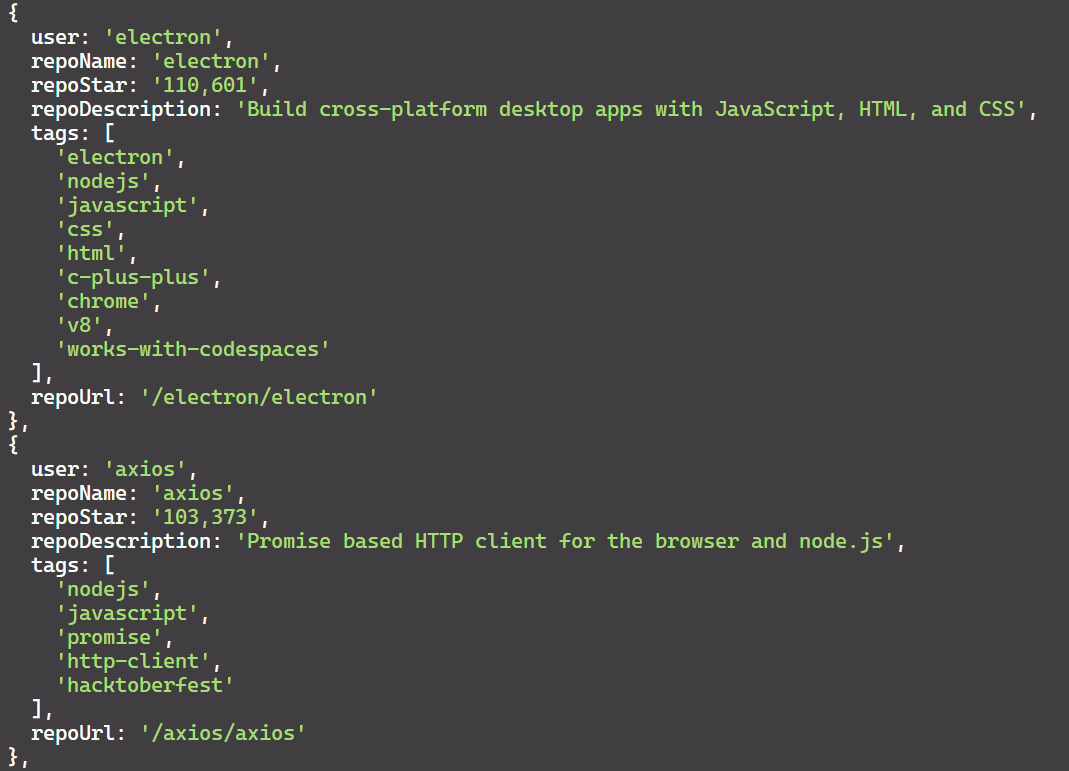
The result is:
If you're interested in exploring more about web scraping with Node.js beyond Puppeteer, you might find our comprehensive guide on Node.js web scraping helpful. This article covers additional libraries and techniques to enhance your scraping capabilities with Node.js.
Advanced Scraping Techniques
We've successfully scraped the single page. Now, let's move on to advanced scraping using Puppeteer. You can click buttons, fill forms, crawl multiple pages, and rotate headers and proxies to make your scraping more reliable.
Clicking Buttons and Waiting for Actions
You can load more repositories by clicking the 'Load more…' button at the bottom of the page. Here are the actions to tell Puppeteer to load more repositories:
- Wait for the "Load more..." button to appear.
- Click the "Load more..." button.
- Wait for the new repositories to load before proceeding.

Clicking buttons with Puppeteer is straightforward! Simply prefix your search with "text/" followed by the text you're looking for. Puppeteer will then locate the element containing that text and click it.
const buttonSelector = "text/Load more";
await page.waitForSelector(buttonSelector);
await page.click(buttonSelector);
Crawling Multiple Pages
To crawl multiple pages, you need to click the "Load more" button repeatedly until you reach the end. However, we can write code to automate this process and scrape a specific number of repositories you want. For example, imagine there are 10,000 repositories for "nodejs" and you only want to extract data for 1,000 of them.
The Node.js Google Maps Scraping Library empowers developers to extract comprehensive location information from Google Maps effortlessly. This library streamlines…
The Google SERP API library is a comprehensive solution that allows developers to integrate Google Search Engine Results Page (SERP) data. It provides a simplified…
Here's how the script will crawl multiple pages:
- Open the 'nodejs' topic page on GitHub.
- Create an empty set to store unique repository data entries.
- Wait for the
article.borderelement to load, indicating the presence of repositories. - Use Puppeteer's
evaluatefunction to extract data from each repository. - Check if the extracted data is already present in the set using JSON string comparison. If unique, add it to the set.
- If the set size reaches the desired number of repositories (30 in this case), stop iterating.
- Otherwise, try to find and click the 'Load more' button to navigate to the next page of repositories.
Here’s the code:
import puppeteer from "puppeteer";
import { exit } from "process";

async function scrapeData(numRepos) {
    try {
        // Launch headless browser with default viewport
        const browser = await puppeteer.launch({ headless: true });
        const page = await browser.newPage();

        // Navigate to nodejs
        await page.goto("<https://github.com/topics/nodejs>");

        // Use a Set to store unique entries efficiently
        let uniqueRepos = new Set();

        // Flag to track if there are more repos to load
        let hasMoreRepos = true;

        while (hasMoreRepos && uniqueRepos.size < numRepos) {
            try {
                // Extract data from repositories
                const extractedData = await page.evaluate(() => {
                    const repos = document.querySelectorAll("article.border");
                    const repoData = [];

                    repos.forEach((repo) => {
                        const userLink = repo.querySelector("h3 > a:first-child");
                        const repoLink = repo.querySelector("h3 > a:last-child");
                        const user = userLink.textContent.trim();
                        const repoName = repoLink.textContent.trim();
                        const repoStar = repo.querySelector("#repo-stars-counter-star").title;
                        const repoDescription = repo.querySelector("div.px-3 > p")?.textContent.trim() || "";
                        const tags = Array.from(repo.querySelectorAll("a.topic-tag")).map((tag) => tag.textContent.trim());
                        const repoUrl = repoLink.href;

                        repoData.push({ user, repoName, repoStar, repoDescription, tags, repoUrl });
                    });

                    return repoData;
                });

                extractedData.forEach((entry) => uniqueRepos.add(JSON.stringify(entry)));

                // Check if enough repos have been scraped
                if (uniqueRepos.size >= numRepos) {
                    uniqueRepos = Array.from(uniqueRepos).slice(0, numRepos);
                    hasMoreRepos = false;
                    break;
                }

                // Click "Load more" button if available
                const buttonSelector = "text/Load more";
                const button = await page.waitForSelector(buttonSelector, { timeout: 5000 });
                if (button) {
                    await button.click();
                } else {
                    console.log("No more repos found. All data scraped.");
                    hasMoreRepos = false;
                }
            } catch (error) {
                console.error("Error while extracting data:", error);
                exit(1);
            }
        }

        // Convert unique entries to an array and format JSON content
        const uniqueList = Array.from(uniqueRepos).map((entry) => JSON.parse(entry));
        console.dir(uniqueList, { depth: null });

        await browser.close();
    } catch (error) {
        console.error("Error during scraping process:", error);
        exit(1);
    }
}

scrapeData(30);
Filling Forms and Simulating User Interactions
We'll use two key Puppeteer functions: type to enter the query and press to submit the form by hitting an Enter key press.
import puppeteer from "puppeteer";

(async () => {
    const browser = await puppeteer.launch({ headless: true });
    const page = await browser.newPage();

    await page.goto('<https://youtube.com/>');

    const input = await page.$('input[id="search"]');
    await input.type('nasa');
    await page.keyboard.press('Enter');

    await page.waitForSelector('ytd-video-renderer');
    await page.screenshot({ path: 'youtube_search_image.png' });

    await browser.close();
})();
In the above code:
- Used
page.$('input[id="search"]')to locate the search bar element. - Pressed the ‘Enter’ key using
page.keyboard.press('Enter'). - Waited for the presence of an element with the class
ytd-video-renderer, indicating search results had loaded. - Finally, captured a screenshot.
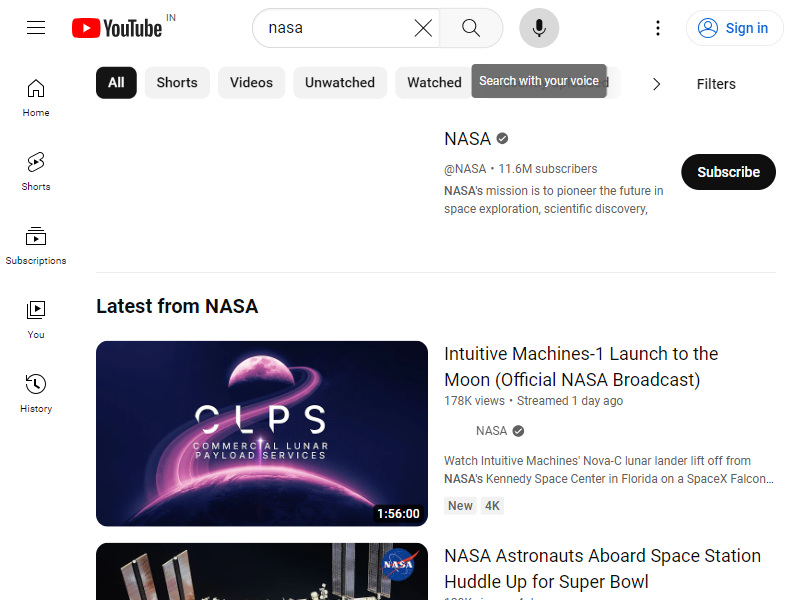
The output image is:
To simulate user interaction, let’s click on the "Shorts" tab using Puppeteer's mouse.click(x, y) method, which allows clicking on specific screen coordinates.
const puppeteer = require("puppeteer");

(async () => {
    const browser = await puppeteer.launch({ headless: false });
    const page = await browser.newPage();

    await page.goto("<https://youtube.com/>");

    // Wait for the search input element with ID "search"
    await page.waitForSelector('input[id="search"]');

    // Type "nasa channel" into the search input
    await page.type('input[id="search"]', "nasa channel");

    // Press Enter to submit the search
    await page.keyboard.press("Enter");

    // Wait for the channel title element with ID "channel-title"
    await page.waitForSelector('#channel-title');

    // Click the mouse at coordinates (200, 80)
    await page.mouse.click(200, 80);

    // Wait for a video renderer element
    await page.waitForSelector('ytd-video-renderer');

    // Take a screenshot
    await page.screenshot({ path: "shorts.png" });

    // Close the browser
    await browser.close();
})();
Successfully clicked the ‘Shorts’ tab.
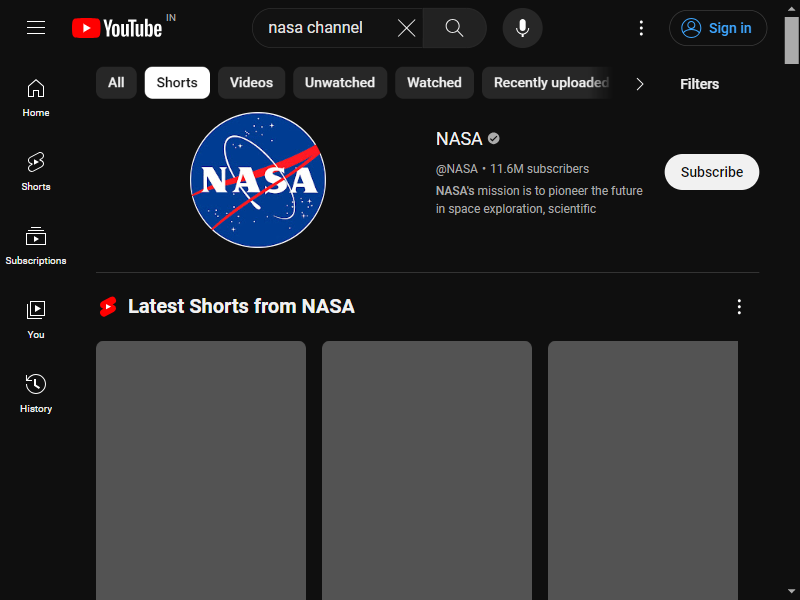
Puppeteer offers several mouse interaction methods, such as mouse.drop(), mouse.reset(), mouse.drag(), and mouse.move(). Go and explore more about these methods here.
Modifying Request Headers
Request headers are crucial in how servers process and respond to your requests. In Puppeteer, the most common way to set custom headers for all requests is through the setExtraHTTPHeaders() method.
First, let's set the headers you want to use.
const requestHeaders = {
    'referer': 'www.google.com',
    'accept': 'text/html,application/xhtml+xml,application/xml;q=0.9,image/avif,image/webp,image/apng,*/*;q=0.8,application/signed-exchange;v=b3;q=0.7',
    'accept-language': 'en-US,en;q=0.9',
    'cache-control': 'max-age=0',
    'accept-encoding': 'gzip, deflate, br',
    'user-agent': 'Mozilla/5.0 (Windows NT 10.0; Win64; x64) AppleWebKit/537.36 (KHTML, like Gecko) Chrome/120.0.0.0 Safari/537.36',
};
These headers provide information about the browser, preferred content formats, language preferences, and most importantly user-agent. This information helps the server deliver the most appropriate response to the user. By default, Puppeteer sends HeadlessChrome as its user-agent.
Here’s the complete code:
import puppeteer from 'puppeteer';

const requestHeaders = {
    'referer': 'www.google.com',
    'accept': 'text/html,application/xhtml+xml,application/xml;q=0.9,image/avif,image/webp,image/apng,*/*;q=0.8,application/signed-exchange;v=b3;q=0.7',
    'accept-language': 'en-US,en;q=0.9',
    'cache-control': 'max-age=0',
    'accept-encoding': 'gzip, deflate, br',
    'user-agent': 'Mozilla/5.0 (Windows NT 10.0; Win64; x64) AppleWebKit/537.36 (KHTML, like Gecko) Chrome/120.0.0.0 Safari/537.36',
};

(async () => {
    const browser = await puppeteer.launch({
        headless: true,
    });

    const page = await browser.newPage();

    // Set extra HTTP headers
    await page.setExtraHTTPHeaders({ ...requestHeaders });

    await page.goto('<https://httpbin.io/headers>');

    const content = await page.evaluate(() => document.body.textContent);

    console.log(content);

    await browser.close()
})();
The output from Puppeteer confirms that the request headers have been successfully changed. The console logs show that the "User-Agent" header has been updated and other relevant parameters have also been updated.

Utilizing Proxies for Scraping Anonymity
Scraping data from websites can sometimes be challenging. Websites may restrict access based on your location or block your IP address. This is where proxies come in handy. Proxies help bypass these restrictions by hiding your real IP address and location.
Firstly, get your proxy from the Free Proxy List. Then, configure Puppeteer to start Chrome with the --proxy-server option:
import puppeteer from "puppeteer";

async function scrapeIp() {
    const proxyServerUrl = '<http://20.210.113.32:80>';
    const browser = await puppeteer.launch({
        args: [`--proxy-server=${proxyServerUrl}`]
    });

    const page = await browser.newPage();

    await page.goto('<https://httpbin.org/ip>');

    const bodyElement = await page.waitForSelector('body');
    const ipText = await bodyElement.getProperty('textContent');
    const ipAddress = await ipText.jsonValue();

    console.log(ipAddress);

    await browser.close();

}
scrapeIp();
The output is:

We did it! The IP address matches the one from the web page, confirming that Puppeteer is using the specified proxy.
Beware of getting banned through the above code implementation. Sending all requests through the same proxy repeatedly can alert the website and trigger a ban.
Fortunately, other options help us manage proxies. Some of them include:
- Rotating Proxies: Making too many rapid requests can flag your script as a threat and get your IP banned. A rotating proxy prevents this by using a pool of IPs, automatically switching after each request.
- puppeteer-page-proxy: This library extends Puppeteer, allowing you to set proxies per page or even per request, offering fine-grained control.
- puppeteer-extra-plugin-proxy: This plugin for Puppeteer-extra adds proxy support, specifically designed to avoid rate limiting in web scraping while also providing anonymity and flexibility for automation tasks.
Note: Free proxies are not recommended due to their unreliability. Specifically, their short lifespan makes them unsuitable for real-world scenarios.
Zillow API Node.js is a programming interface that allows developers to interact with Zillow's real estate data using the Node.js platform. It provides a set of…
Shopify API Node.js framework can be used to create custom eCommerce solutions, integrate Shopify functionality into existing applications, and automate various…
Error Handling
Many errors can occur while scraping web pages. There are several strategies to navigate these challenges. One common approach is using try/catch blocks to gracefully handle errors like failed page navigation. This prevents your code from crashing and allows you to continue execution.
Additionally, you can leverage Puppeteer's waitForSelector method to introduce delays. This ensures specific elements have loaded before interacting with them.
Here's the complete code with error handling:
import puppeteer from "puppeteer";
import { exit } from "process";

async function scrapeData(numRepos) {
    try {
        // Launch headless browser with default viewport
        const browser = await puppeteer.launch({ headless: true });
        const page = await browser.newPage();

        // Navigate to Node.js topic page
        await page.goto("<https://github.com/topics/nodejs>");

        // Use a Set to store unique entries efficiently
        let uniqueRepos = new Set();

        // Flag to track if there are more repos to load
        let hasMoreRepos = true;

        while (hasMoreRepos && uniqueRepos.size < numRepos) {
            try {
                // Extract data from repositories
                const extractedData = await page.evaluate(() => {
                    const repos = document.querySelectorAll("article.border");
                    const repoData = [];

                    repos.forEach((repo) => {
                        const userLink = repo.querySelector("h3 > a:first-child");
                        const repoLink = repo.querySelector("h3 > a:last-child");
                        const user = userLink.textContent.trim();
                        const repoName = repoLink.textContent.trim();
                        const repoStar = repo.querySelector("#repo-stars-counter-star").title;
                        const repoDescription = repo.querySelector("div.px-3 > p")?.textContent.trim() || "";
                        const tags = Array.from(repo.querySelectorAll("a.topic-tag")).map((tag) => tag.textContent.trim());
                        const repoUrl = repoLink.href;

                        repoData.push({ user, repoName, repoStar, repoDescription, tags, repoUrl });
                    });

                    return repoData;
                });

                extractedData.forEach((entry) => uniqueRepos.add(JSON.stringify(entry)));

                // Check if enough repos have been scraped
                if (uniqueRepos.size >= numRepos) {
                    uniqueRepos = Array.from(uniqueRepos).slice(0, numRepos);
                    hasMoreRepos = false;
                    break;
                }

                // Click "Load more" button if available
                const buttonSelector = "text/Load more";
                const button = await page.waitForSelector(buttonSelector, { timeout: 5000 });
                if (button) {
                    await button.click();
                } else {
                    console.log("No more repos found. All data scraped.");
                    hasMoreRepos = false;
                }
            } catch (error) {
                console.error("Error while extracting data:", error);
                exit(1);
            }
        }

        // Convert unique entries to an array and format JSON content
        const uniqueList = Array.from(uniqueRepos).map((entry) => JSON.parse(entry));
        console.dir(uniqueList, { depth: null });

        await browser.close();
    } catch (error) {
        console.error("Error during scraping process:", error);
        exit(1);
    }
}

scrapeData(50);
Save Scraped Data to a File
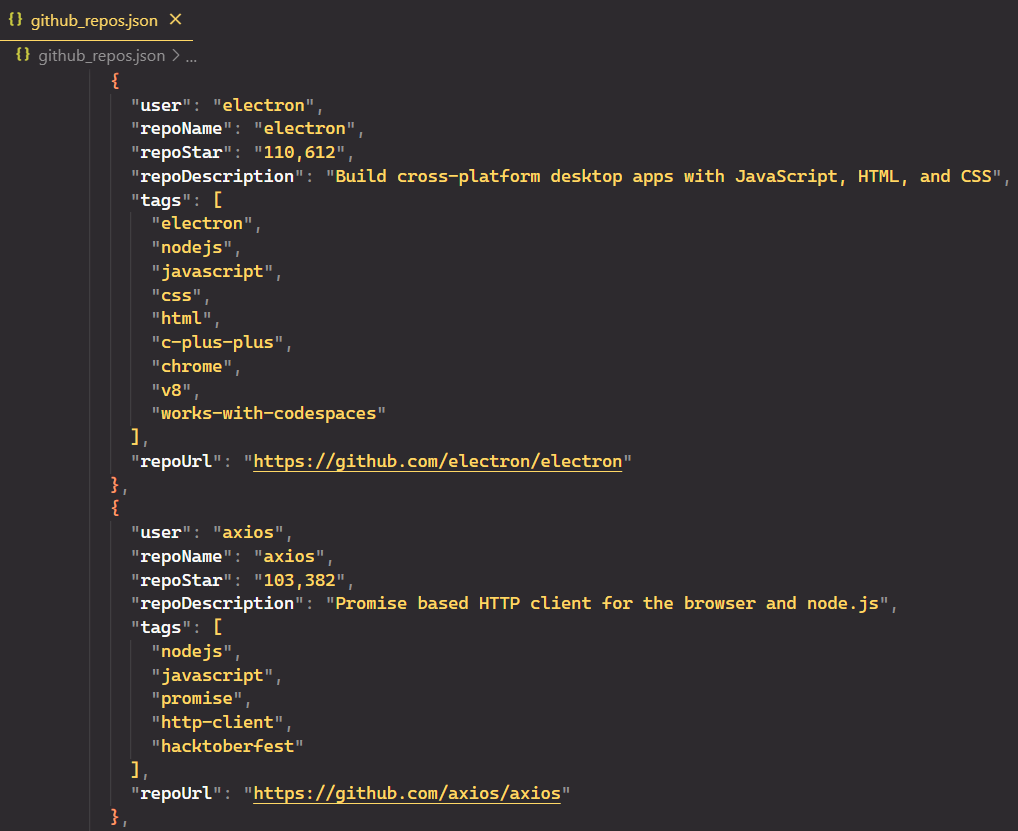
Awesome! We've successfully scraped the data. Let's save it to a JSON file instead of printing it to the console. JSON is a structured format that enables you to store and organize complex data clearly and consistently.
We'll import the fs module and use fs.writeFile() to write the data to the file. But before doing this, let's convert the JavaScript object uniqueList into a JSON string using JSON.stringify().
const uniqueList = Array.from(uniqueRepos).map((entry) => JSON.parse(entry));
const jsonContent = JSON.stringify(uniqueList, null, 2);
await fs.writeFile("github_repos.json", jsonContent);
Here’s the complete code:
import puppeteer from "puppeteer";
import fs from "fs";
import { exit } from "process";

async function scrapeData(numRepos) {
    try {
        // Launch headless browser with default viewport
        const browser = await puppeteer.launch({ headless: true });
        const page = await browser.newPage();

        // Navigate to Node.js topic page
        await page.goto("<https://github.com/topics/nodejs>");

        // Use a Set to store unique entries efficiently
        let uniqueRepos = new Set();

        // Flag to track if there are more repos to load
        let hasMoreRepos = true;

        while (hasMoreRepos && uniqueRepos.size < numRepos) {
            try {
                // Extract data from repositories
                const extractedData = await page.evaluate(() => {
                    const repos = document.querySelectorAll("article.border");
                    const repoData = [];

                    repos.forEach((repo) => {
                        const userLink = repo.querySelector("h3 > a:first-child");
                        const repoLink = repo.querySelector("h3 > a:last-child");
                        const user = userLink.textContent.trim();
                        const repoName = repoLink.textContent.trim();
                        const repoStar = repo.querySelector("#repo-stars-counter-star").title;
                        const repoDescription = repo.querySelector("div.px-3 > p")?.textContent.trim() || "";
                        const tags = Array.from(repo.querySelectorAll("a.topic-tag")).map((tag) => tag.textContent.trim());
                        const repoUrl = repoLink.href;

                        repoData.push({ user, repoName, repoStar, repoDescription, tags, repoUrl });
                    });

                    return repoData;
                });

                extractedData.forEach((entry) => uniqueRepos.add(JSON.stringify(entry)));

                // Check if enough repos have been scraped
                if (uniqueRepos.size >= numRepos) {
                    uniqueRepos = Array.from(uniqueRepos).slice(0, numRepos);
                    hasMoreRepos = false;
                    break;
                }

                // Click "Load more" button if available
                const buttonSelector = "text/Load more";
                const button = await page.waitForSelector(buttonSelector, { timeout: 5000 });
                if (button) {
                    await button.click();
                } else {
                    console.log("No more repos found. All data scraped.");
                    hasMoreRepos = false;
                }
            } catch (error) {
                console.error("Error while extracting data:", error);
                exit(1);
            }
        }

        // Convert unique entries to an array and format JSON content
        const uniqueList = Array.from(uniqueRepos).map((entry) => JSON.parse(entry));
        const jsonContent = JSON.stringify(uniqueList, null, 2);
        await fs.writeFile("github_repos.json", jsonContent);

        console.log(`${uniqueList.length} unique repositories scraped and saved to 'github_repos.json'.`);
        await browser.close();
    } catch (error) {
        console.error("Error during scraping process:", error);
        exit(1);
    }
}

scrapeData(50);
JSON file:
Alternatives to Puppeteer
Puppeteer is popular for its direct browser communication through the DevTools protocol and ease of use. But it has limitations including limited browser support & single-language dependency. These limitations can lead developers to explore other options.
Here are some most popular alternatives to Puppeteer:
Selenium: It's a popular browser automation tool that works with many browsers (Chrome, Firefox, Safari, etc.) and lets you use different programming languages (Python, Java, JavaScript, etc.). However, compared to Puppeteer, Selenium can be slower and use more resources, especially for big scraping jobs.
Playwright: This open-source library offers broader browser support like Chrome, Firefox, Edge, and WebKit browsers. Its major advantage lies in its cross-browser support, allowing you to test web applications on multiple browsers at once. It also supports multiple programming languages, making it flexible for different developers.
HasData NodeJS SDK: Unlike the previous tools, HasData is a cloud-based web scraping service that removes the need for managing your own infrastructure. It takes care of the complexities of browser automation, handling things like managing proxies, dealing with anti-bot measures, and rendering JavaScript. This allows you to focus on writing code to extract the data you need without worrying about the underlying infrastructure.
Choosing the right scraping tool depends on your project. Puppeteer's great, but other options might fit you better. Try them out to see what works.
Conclusion
Puppeteer offers a powerful and versatile toolkit for web scraping tasks. By leveraging its capabilities, you can efficiently extract valuable data from websites, automate repetitive browser interactions, and streamline various workflows.
In this guide, we focused on the GitHub Topics page, where you can choose a topic (like nodejs) and specify the number of repositories to scrape. We covered how to handle errors during scraping, avoid detection, and discussed the benefits of web scraping APIs for easier and more efficient data extraction.
As you gain experience, explore advanced techniques like proxy rotation and browser plugins to enhance your scraping capabilities and navigate complex website structures. With dedication and exploration, Puppeteer can empower you to unlock valuable insights from the vast web.


