The ever-growing volume of data on the internet has made web scraping increasingly valuable for those who want to access this information. While many companies used manual data collection in the past, most companies are now looking for ways to automate data collection, as scraping can save time and money.
Companies that use web scraping can gain a competitive advantage by having access to more complete and up-to-date information. The most popular programming languages for creating web scrapers are Python and NodeJS.
Get fast, real-time access to structured Google search results with our SERP API. No blocks or CAPTCHAs - ever. Streamline your development process without worrying…
Gain instant access to a wealth of business data on Google Maps, effortlessly extracting vital information like location, operating hours, reviews, and more in HTML…
This article covers the basics of web scraping with Python, its advantages, and how to set up your programming environment. We will also provide numerous examples, ranging from simple data collection methods to more complex ones involving proxies and multithreading.
By the end of this article, you will have a solid understanding of web scraping with Python and be able to build your own web scraper to collect data from the web.
Advantages of Using Python for Web Scraping
Although Python was created in 1991, it has only gained popularity in recent years with the advent of Python 3, which is more refined and functional. This guide will explore why Python is not only a great programming language for beginners, but also one of the most suitable for web scraping.
Python's Versatility and Readability
One of the key benefits of using Python for web scraping is its readability and ease of use, making it ideal for beginners. Python's syntax is clear and concise, simplifying the process of writing and understanding code.
This readability is especially important when working with web scraping, where you need to interact with HTML code. Python makes it easy to find, analyze, and extract data from different elements of web pages.
Rich Ecosystem of Web Scraping Libraries
As mentioned in the installation section, Python offers a variety of libraries specifically designed for web scraping, which simplifies development and speeds up the process. The most popular, comprehensive, well-documented, and widely used libraries are: Beautiful Soup, Requests, Scrapy, lxml, Selenium, URLlib, MechanicalSoup and Pyppeteer. To choose the most suitable python library, you can use the following algorithm:
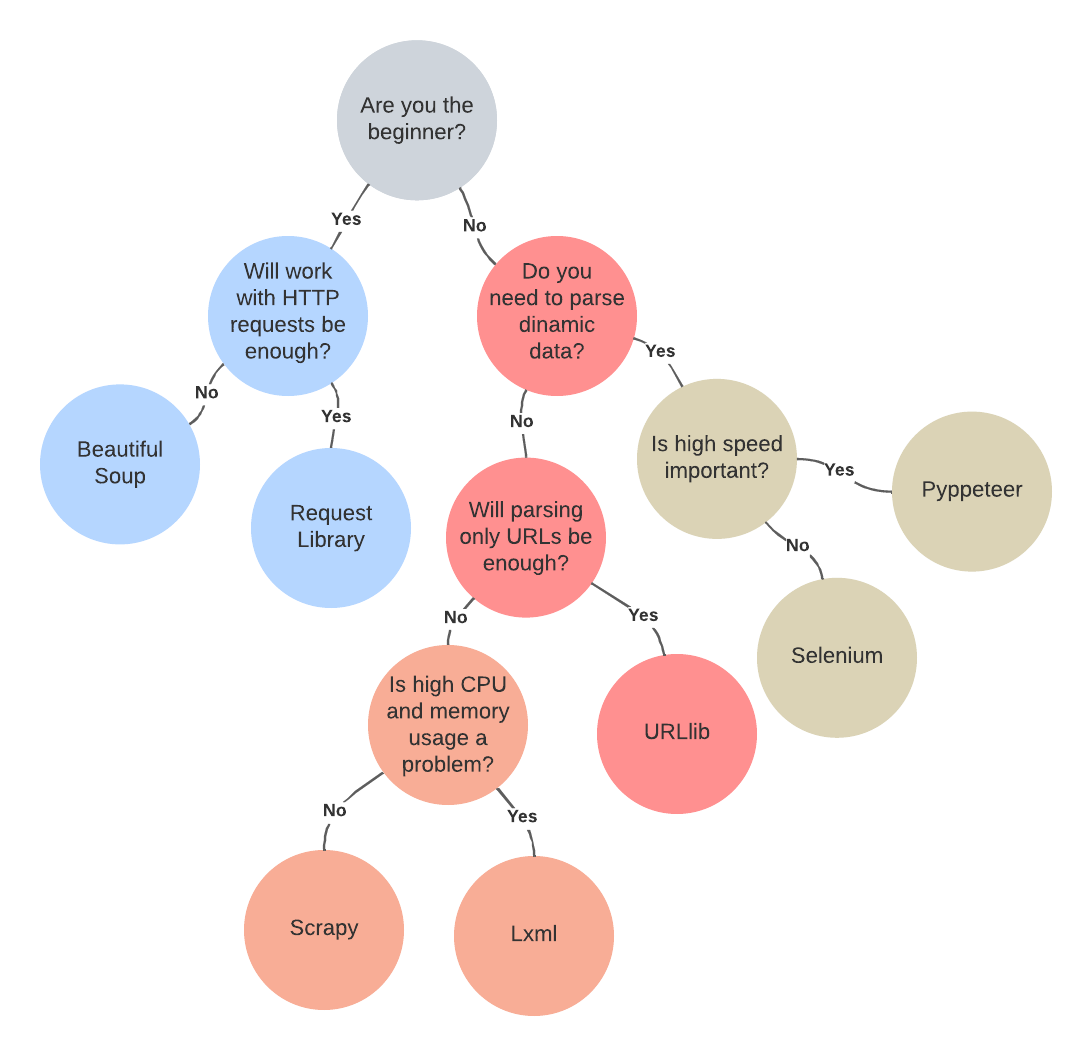
If you want to get a more detailed overview of the libraries, you can find the necessary articles in our blog. For example, in one of the articles, we talked about popular scraping libraries, as well as their pros and cons.
Community Support and Resources
Python boasts a large and active community of developers, which translates to readily available help, support, and problem-solving. Forums, blogs, online courses, and other resources dedicated to Python web scraping are abundant.
With a vibrant community, you can quickly find solutions to your problems, get advice on code optimization, and stay up-to-date with new web scraping techniques.
Setting Up the Environment
Before we dive into Python web scraping techniques, let's quickly cover how to install Python on various platforms and set up the necessary libraries. If you already have Python and an IDE installed, feel free to skip this step.
Installing Python
In this article, we will consider the installation process for two popular operating systems: Windows and Linux. For MacOS users, the installation process is very similar to Linux systems, so we will not dwell on it.
Linux
Ubuntu is one of the most popular Linux distributions. Since version 20.04, Python 3 is pre-installed by default. Therefore, if you try to install it using the command:
sudo apt install python3You will receive a message that it is already present in the system:

To check the version of Python installed and verify its presence in the system, you can use the following command:
python3 -VAfter that, you need to install the package manager:
sudo apt install python3-pipDuring the installation process, you will be asked to confirm the installation:
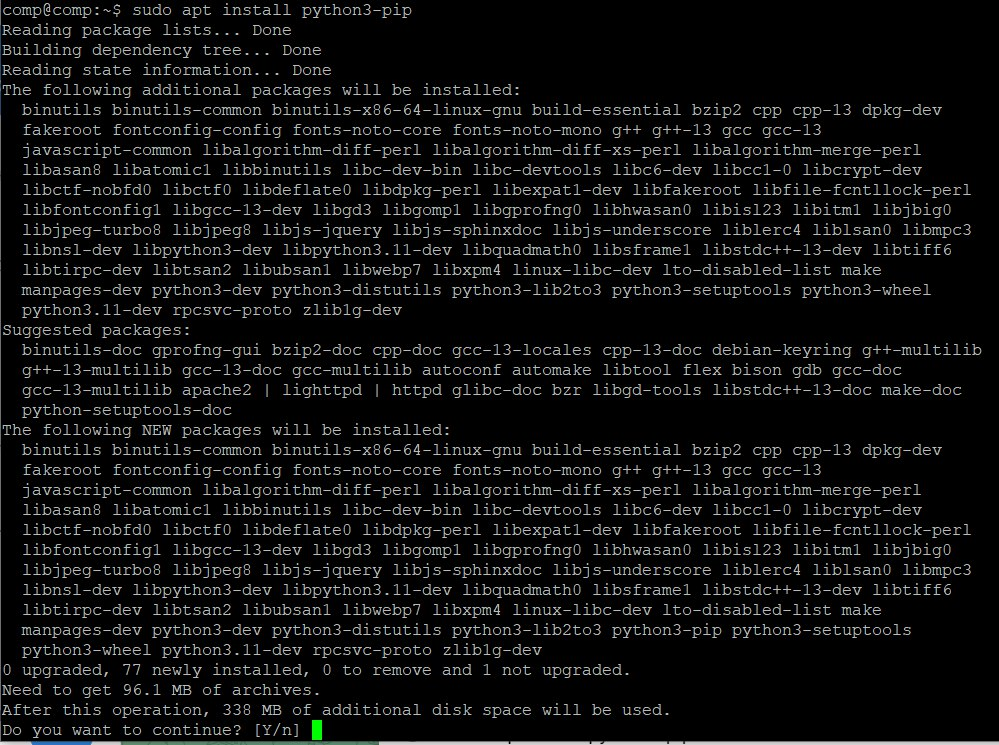
After that, you can use the package manager to install the necessary libraries. However, it is worth noting that some basic libraries like requests are pre-installed and do not need additional installation.
Windows
Go to the official Python website and download the latest stable version. At the time of writing, this is Python 3.12.2.
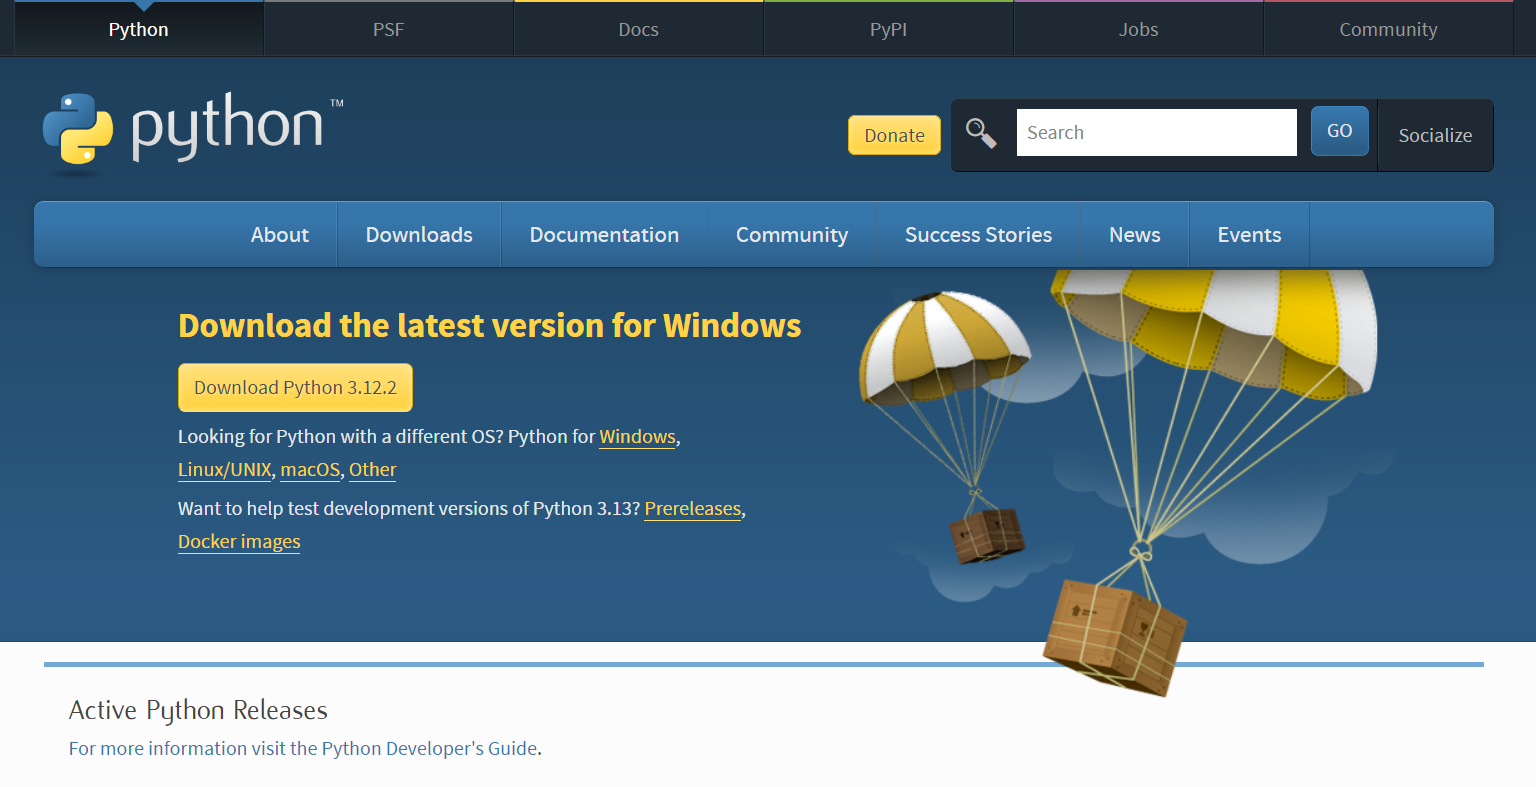
Run the downloaded installer and follow the on-screen instructions. Make sure to check the box to add Python to your system path. This is important so you can run Python programs from anywhere.
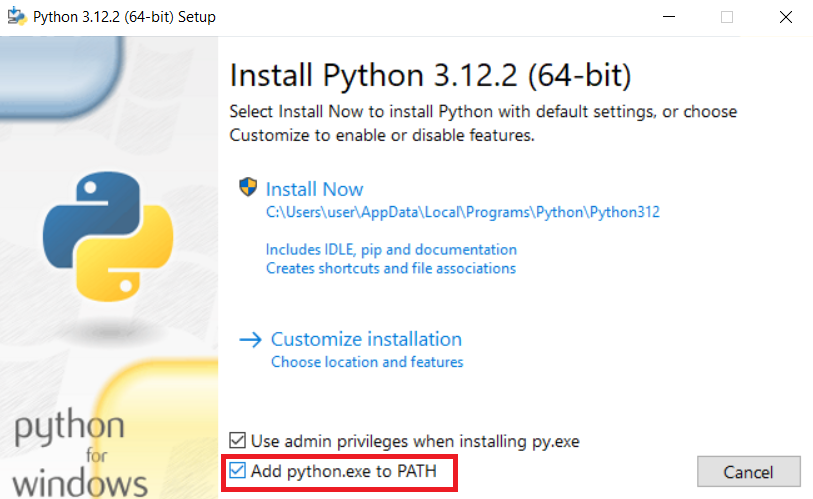
Open a command prompt and type:
python --versionYou should see the version number of the installed interpreter and that means Python is installed correctly.
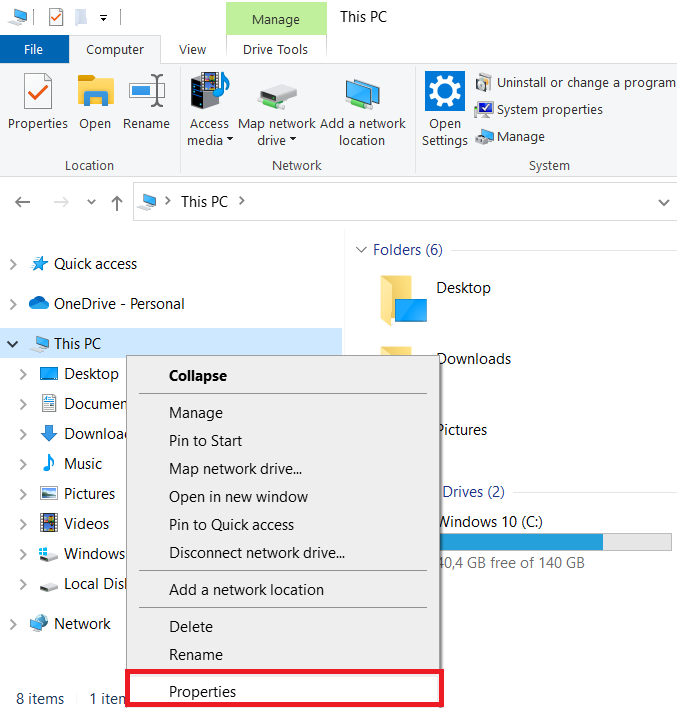
If you missed or forgot to check this box during the installation process, or for any other reason, you need to manually specify the path to python.exe in the environment variables. To do this, right-click on the This PC icon in Explorer and go to Properties. This will bring up the Control Panel and open the settings window.
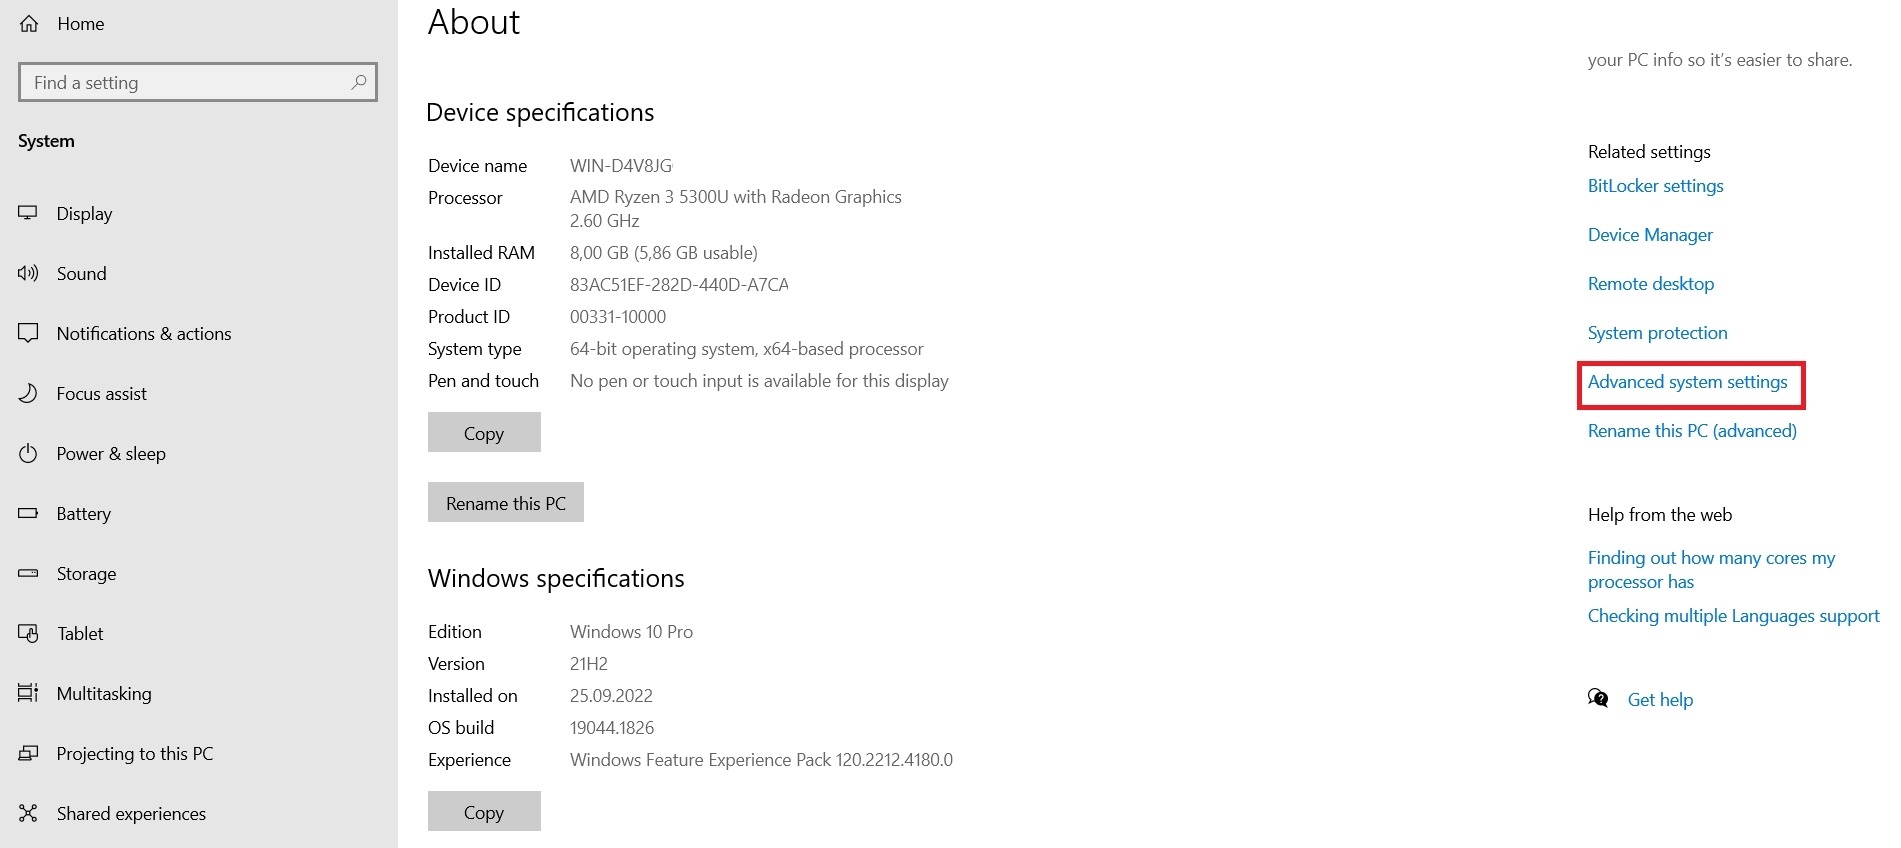
Here you should find Advanced system settings, which can be located on the right side of the window or at the very bottom of the page.
Next, go to the Environment Variables settings menu.
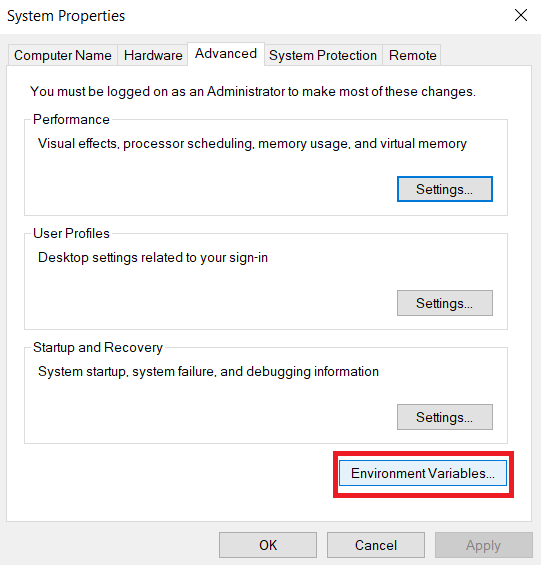
Here, in the Path variable, you need to specify the path to the python.exe interpreter file, which will allow you to run your Python programs.
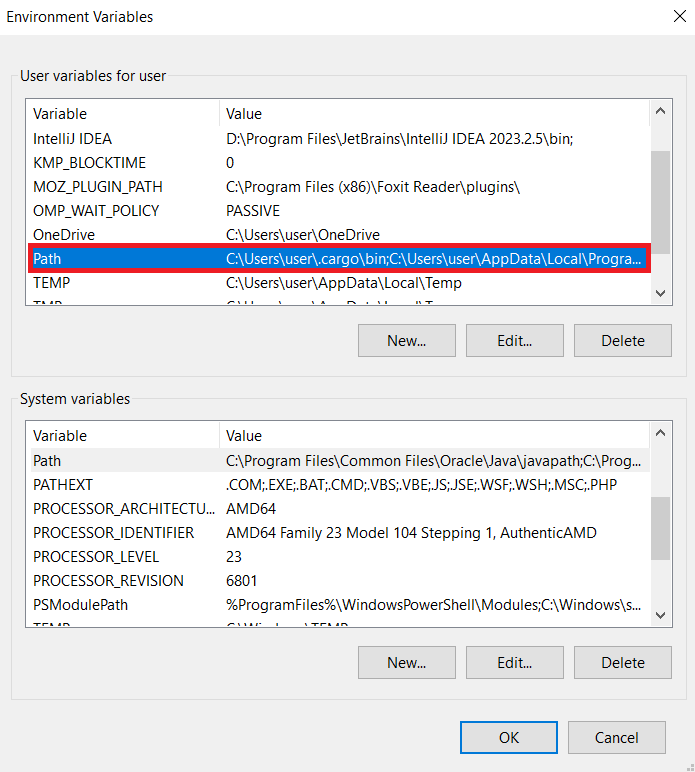
The path may look like this:
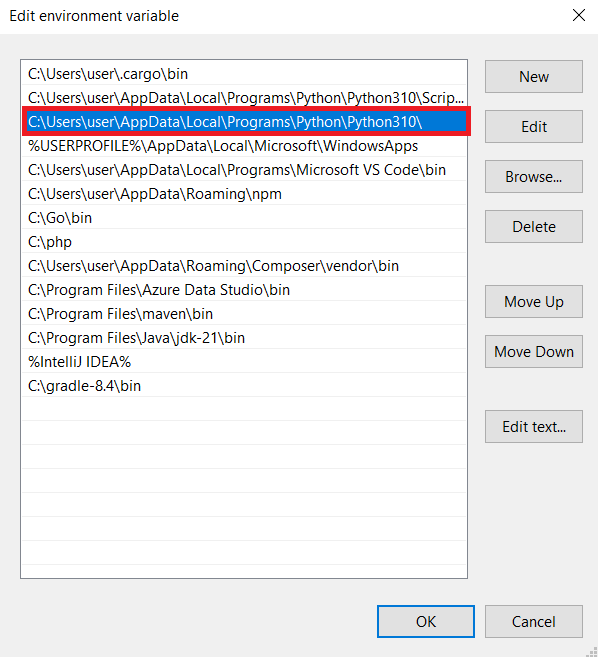
To make sure everything worked successfully, go to the command prompt and check you python version again.
Choosing a Code Editor or IDE
The choice between a code editor and an IDE (Integrated Development Environment) for Python web scraping depends on your preferences, experience, and project requirements.
If you are a beginner and just starting to create your own projects, it may be easier for you to use a full-fledged IDE to develop your projects. This will help you avoid the need to additionally configure your development environment and will provide you with all the necessary tools.
On the other hand, if you have been programming for a long time, not only in Python, any code editor that has a syntax highlighting feature in the desired programming language will be enough for you to simplify the development process.
The most popular options are:
- PyCharm: A full-fledged IDE that was developed specifically for Python with integrated version control, debugger, and code analysis tools. Can be resource-intensive.
- VSCode: Lightweight, fast, and highly customizable with many plugins. Supports Python development and has built-in Git support. Some users may find it less powerful than full-fledged IDEs.
- Sublime Text 2: Basic code editor with syntax highlighting. Very lightweight and fast, with a wide variety of plugins and themes. Some users prefer its simplicity and visual appeal.
Of course, besides these three options, there are many other IDEs and code editors, such as Jupyter Notebook, Atom or Spyder. However, they are less popular. In any case, the choice of the environment should depend only on your personal preferences, because the more comfortable your development environment is, the more efficiently you will be able to write code.
Zillow Scraper is the tool for real estate agents, investors, and market researchers. Its easy-to-use interface requires no coding knowledge and allows users to…
Redfin Scraper is an innovative tool that provides real estate agents, investors, and data analysts with a convenient way of collecting and organizing property-related…
Virtual Environment
Virtual environments are a crucial tool for Python developers. They provide an isolated environment for each project, ensuring dependency isolation and preventing conflicts. Here we will tell you how to create, activate, and manage virtual environments in Python.
This is useful when you need to work with different versions of libraries, avoid dependency conflicts between projects, and keep your development environment clean. By creating isolated virtual environments for each of your projects, you can be sure that you will not have any problems or conflicts in the future. Additionally, it will allow you to safely make changes to the libraries themselves without fear that these changes will affect all of your projects.
The venv tool is used to create a virtual environment. It may already be preinstalled, but if not, you can use the following command:
sudo apt install python3-venv python3-dev libsqlite3-devAfter installing the package for creating a virtual environment, you can use it:
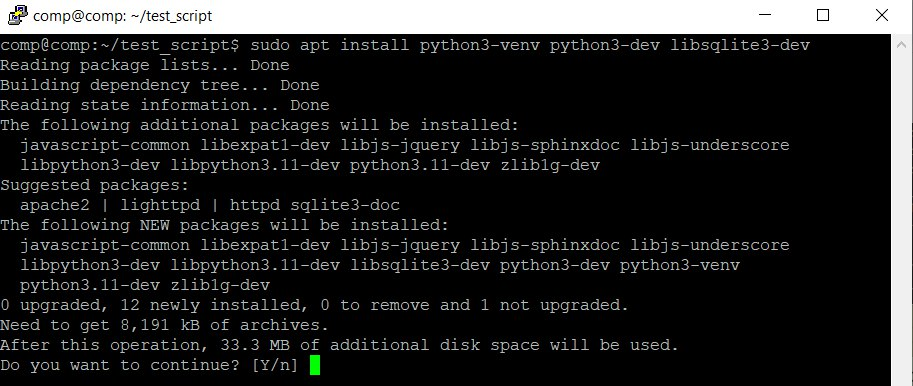
To create a new environment, enter the following command in the terminal or command prompt depending on your system:
python -m venv newenv Once you have created a virtual environment, you need to activate it before you can use it. Different commands are used depending on the operating system. For Windows:
newenv\Scripts\activateFor Linux and MacOS:
source myenv/bin/activate Activating a virtual environment changes the Python environment so that only the libraries installed in that environment are used when installing packages and running scripts. Therefore, it is important to remember that when you create a virtual environment, you will only have pip and setup tools available to you initially.
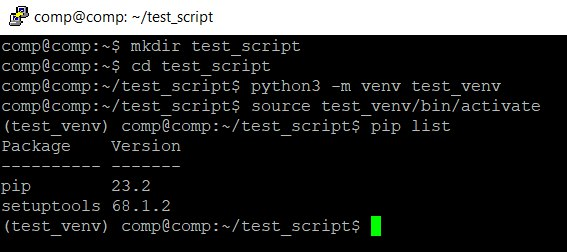
To deactivate a virtual environment, simply run the following command:
deactivate It is a good practice to create a requirements.txt file for each project. This file lists all the packages and their versions that are required to run the project. You can create a requirements.txt file by running the following command:
pip freeze > requirements.txt To install dependencies from a requirements.txt file, run:
pip install -r requirements.txt Using virtual environments is a recommended practice for Python developers. They help you manage dependencies effectively and keep your projects isolated from each other.
Installing Libraries
To get started, we need to install the necessary libraries using the pip package manager. Let's install the libraries we'll be using in this tutorial.
pip install bs4 requests selenium lxml pysqlite3 pandasThis will install all the required libraries in your virtual environment:
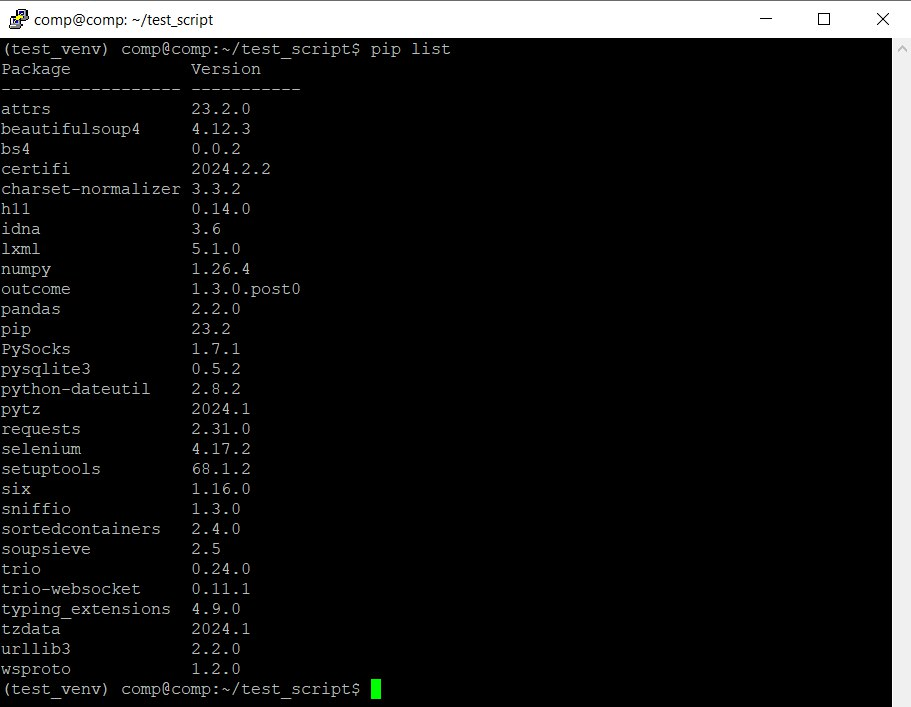
Brief explanation of the libraries:
- Requests: Makes HTTP requests.
- bs4 and lxml: Parse and process HTML document.
- Selenium: Allows us to use a headless browser.
- sqlite and pandas: Process and store extracted information.
We will also use some additional libraries that will be installed later.
Getting HTML Code of a Page using HTTP Requests
Now that you have your environment set up and all the necessary libraries installed, we can move on to the web scraping tutorial. There we will go through all the steps you will need to take during scraping. The first and simplest step is to get the HTML code of the page for further processing.
Basics of HTTP Requests with Python
Requests is one of the most popular Python libraries for making HTTP requests. It supports all major methods, including GET, POST, PUT, and DELETE. Its simplicity makes it a staple in projects that require HTTP communication.
To use Requests, create a new *.py file and import the library:
import requestsYou can then make requests to any website within your script. We'll use the opencart demo site as an example throughout.
Retrieving HTML Content using Requests
To get the content of a web page send a GET request to the desired URL.
url = 'https://demo.opencart.com/'
response = requests.get(url)
The response object will contain information about the server's response, including the contents of the web page. To view the response, print it to the screen:
print(response.text)We will use and process this data later.
Handling Headers
When scraping html pages, you may encounter IP blocking if the website detects you as a bot. To avoid this, you can make your requests appear more like those made by a human user.
One way to do this is to use proxies and headers. Proxies are servers that act as intermediaries between your computer and the web server. They can be used to hide your IP address and make it appear as if you are connecting from a different location.
Headers are additional pieces of information that can be included with your requests. They can be used to provide information about your browser, operating system, and other details.
The requests library in Python makes it easy to add and customize headers for your requests. For example, let's add a User-Agent header to identify our application:
headers = {'User-Agent': 'My-App'}
response = requests.get(url, headers=headers)
This will send a request with the User-Agent header set to My-App. This can help to prevent IP blocking and make your scraping more reliable.
Authentication
To access a resource that requires authentication, you can pass your credentials using the auth parameter. For basic HTTP authentication, you'll need to import the HTTPBasicAuth class from the requests.auth module:
from requests.auth import HTTPBasicAuthThen, you can use it in your script:
username = 'your_username'
password = 'your_password'

response = requests.get(url, auth=HTTPBasicAuth(username, password))
Other authentication methods, such as HTTPDigestAuth, can also be used if necessary.
Parsing HTML Code of a Page
Now that we have the HTML code of the page, let's explore several ways to extract the required information:
- Regular Expressions. While not very flexible, this method simplifies extracting specific information matching predefined patterns, such as email addresses with consistent structures.
- CSS Selectors or XPath. This is the most straightforward and convenient way to extract information from HTML document.
- Specialized Libraries. Libraries like Newspapers3k or Readability are tailored for extracting specific information.
Before diving into each method, let's analyze the page structure of the site that we will scrape. Go to the demo OpenCart page and open DevTools (press F12 or right-click and select Inspect).
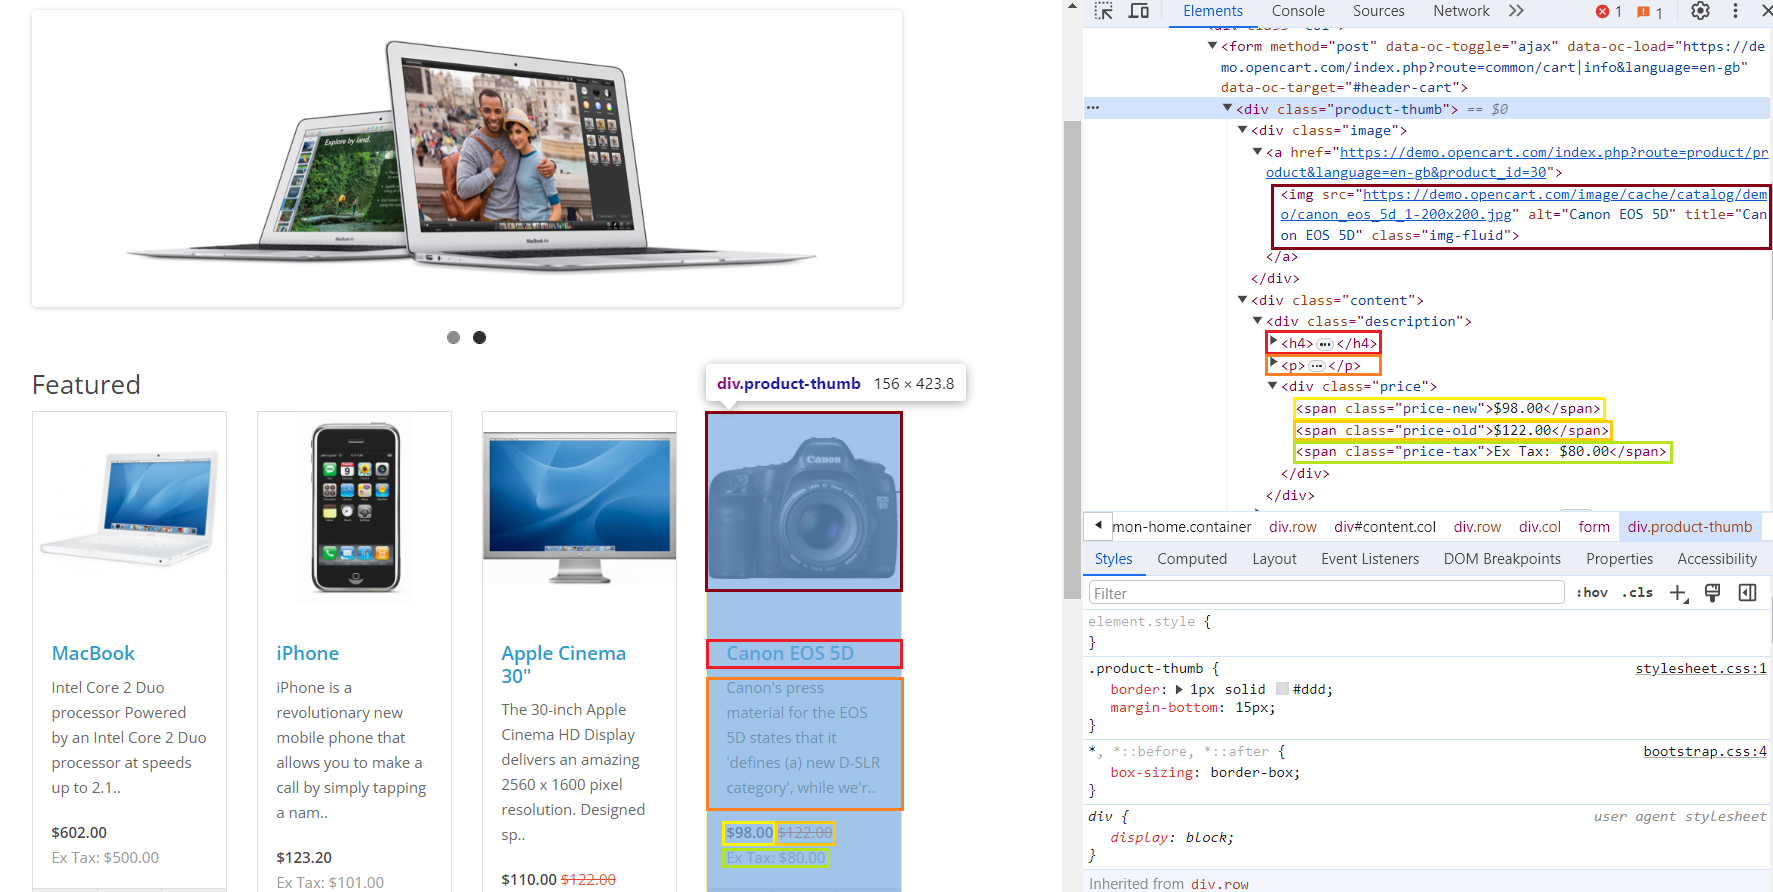
We've highlighted different elements and their corresponding code in different colors. Since the html tags are the same for each product, we can configure the search for all matching elements using one product as an example.
Extracting Data with Regular Expressions
Regular expressions (regex) are a powerful tool for working with text data. Python supports regex through the standard re module.
While regex aren't ideal for extracting headers or prices from html pages, they are the best choice at extracting specific information, such as email addresses, which have a consistent structure across websites.
To use regex in your script, import the library:
import reNext, you define patterns that describe the desired information:
product_description_match = re.findall(r'<p>([^<]+)</p>', html_content)
product_price_match = re.findall(r'<span class="price-new">([^<]+)</span>', html_content)
To extract email addresses, you can use the following regex:
emails = re.findall(r'\b[A-Za-z0-9._%+-]+@[A-Za-z0-9.-]+\.[A-Z|a-z]{2,}\b', html_content)This will extract email addresses from any web page. So, let’s go to the more convenient methods for extracting elements.
Parsing HTML Elements using CSS Selectors with Beautiful Soup
To extract data using CSS selectors, we will use the BeautifulSoup library, which was specially designed for this purpose. We have previously written about what CSS selectors are and what they are used for, so we will not dwell on this here.
First, import it into your script:
from bs4 import BeautifulSoupThen process the data we received earlier:
html_content = response.text
soup = BeautifulSoup(html_content, 'html.parser')
Once we have parsed the received HTML page, we can simply extract all the necessary selectors:
products = []

for product_elem in soup.select('div.product-thumb'):
    product = {
        "Image": product_elem.select_one('div.image > a > img')['src'],
        "Title": product_elem.select_one('h4').text.strip(),
        "Link": product_elem.select_one('h4 > a')['href'],
        "Description": product_elem.select_one('p').text.strip(),
        "Old Price": product_elem.select_one('span.price-old').text.strip(),
        "New Price": product_elem.select_one('span.price-new').text.strip(),
        "Tax": product_elem.select_one('span.price-tax').text.strip(),
    }
    products.append(product)
After that, we can either save the data, which is already structured, or use it for further work.
Extracting Data with Xpath and Lxml
XPath is a more efficient way to extract data compared to CSS selectors. However, it can be more difficult for beginners to use. The LXML library is better suited for working with XPath, so let's import it into the script:
from lxml import htmlNext, parse HTML code of the page:
html_content = response.text
tree = html.fromstring(html_content)
And extract the same data as last time, but using XPath:
products = []

for product_elem in tree.xpath('//div[@class="product-thumb"]'):
    product = {
        "Image": product_elem.xpath('div[@class="image"]/a/img/@src')[0],
        "Title": product_elem.xpath('h4/text()')[0].strip(),
        "Link": product_elem.xpath('h4/a/@href')[0],
        "Description": product_elem.xpath('p/text()')[0].strip(),
        "Old Price": product_elem.xpath('span[@class="price-old"]/text()')[0].strip(),
        "New Price": product_elem.xpath('span[@class="price-new"]/text()')[0].strip(),
        "Tax": product_elem.xpath('span[@class="price-tax"]/text()')[0].strip(),
    }
    products.append(product)
As a result, we will get the same data, but extracted using a slightly different method.
Extract Content from News Articles with Newspaper3k
The newspaper3k library is a powerful tool for extracting textual data from news pages and blogs. It's not included in the recommended libraries for installation because it's considered an optional tool for scraping.
To install it, use the command:
pip install newspaper3kTo extract content from news articles, we need the Articles module, so let's import it into the project:
from newspaper import ArticleSince we need a text page for a good example, let's look at the example.com website. First, let's specify the page address:
article_url = 'https://example.com/'Then create an article object:
article = Article(article_url)Download and parse the contents of the page:
article.download()
article.parse()
And then use special functions to extract the title and text of the article:
title = article.title
text = article.text
This python library may not be convenient for scraping product pages, but it is the best for extracting data from news articles or text pages.
Extract the Main Content with Readability
Readability is a lesser-known, specialized library for web scraping. It extracts the main content from HTML code, ignoring ads and banners. It's best suited for text-heavy pages.
Use the following command to install the library:
pip install readabilityImport the library to the project:
from readability import DocumentYou will need to get the HTML code of the page beforehand, as the library only allows you to process data, not retrieve it. Then, use the following command to extract the main content:
doc = Document(html_content)
main_content = doc.summary()
While it may seem less versatile than other libraries, Readability shines when dealing with ad-heavy pages.
Handling Dynamic Web Pages
The libraries we've covered are great for scraping static and simple web pages with weak bot protection. However, most modern websites use dynamic content loading, which cannot be obtained with a simple GET request.
Additionally, to reduce the risk of blocking, more sophisticated extracting methods are needed that not only scrape data from web pages but also imitate real user behavior.
Understanding dynamic content and AJAX
Dynamic content refers to elements on web pages that can change or update without refreshing the entire page. This improves user experience by reducing loading times and providing a smoother interaction.
AJAX (Asynchronous JavaScript and XML) plays a key role in dynamic content. It allows web pages to exchange data with the server asynchronously, without requiring a full refresh. This is done in the background, and once the response is received, JavaScript code updates the page content accordingly.
Zillow API Python is a Python library that provides convenient access to the Zillow API. It allows developers to retrieve real estate data such as property details,…
Our Shopify Node API offers a seamless solution, allowing you to get data from these Shopify stores without the need to navigate the complexities of web scraping,…
Handling JavaScript-driven content using headless browsers
Headless browsers run in the background without a graphical user interface (GUI) and are controlled programmatically. They are useful for automating web scraping, especially when dealing with dynamic web pages.
Selenium is a popular library that can be used to automate web tasks, including web scraping. It supports headless mode, allowing you to execute JavaScript and handle dynamic content.
We have previously written about how to scrape data using Selenium, so in this python web scraping tutorial we will stick to a fairly simple example.
First, import libraries and modules:
from selenium import webdriver
from selenium.webdriver.chrome.options import Options
Create a browser object and set headless mode:
chrome_options = Options()
chrome_options.add_argument('--headless')
chrome_options.add_argument('--disable-gpu')
driver = webdriver.Chrome(options=chrome_options)
Navigate to the page:
url = 'https://demo.opencart.com/'
driver.get(url)
Then extract data from the page:
content = driver.page_sourceDefault script will wait for the full page load unless specified in the settings. Selenium supports both CSS selectors and XPath, so you can extract information in any way convenient for you. To do this, you will need to import an additional module:
from selenium.webdriver.common.by import ByLet’s parse the data using CSS selectors:
products = []

for product_elem in driver.find_elements(By.CSS_SELECTOR, 'div.product-thumb'):
    product = {
        "Image": product_elem.find_element(By.CSS_SELECTOR, 'div.image > a > img').get_attribute('src'),
        "Title": product_elem.find_element(By.CSS_SELECTOR, 'h4').text.strip(),
        "Link": product_elem.find_element(By.CSS_SELECTOR, 'h4 > a').get_attribute('href'),
        "Description": product_elem.find_element(By.CSS_SELECTOR, 'p').text.strip(),
        "Old Price": product_elem.find_element(By.CSS_SELECTOR, 'span.price-old').text.strip(),
        "New Price": product_elem.find_element(By.CSS_SELECTOR, 'span.price-new').text.strip(),
        "Tax": product_elem.find_element(By.CSS_SELECTOR, 'span.price-tax').text.strip(),
    }
    products.append(product)
And using XPath:
products = []

for product_elem in driver.find_elements(By.XPATH, '//div[@class="product-thumb"]'):
    product = {
        "Image": product_elem.find_element(By.XPATH, 'div[@class="image"]/a/img').get_attribute('src'),
        "Title": product_elem.find_element(By.XPATH, 'h4').text.strip(),
        "Link": product_elem.find_element(By.XPATH, 'h4/a').get_attribute('href'),
        "Description": product_elem.find_element(By.XPATH, 'p').text.strip(),
        "Old Price": product_elem.find_element(By.XPATH, 'span[@class="price-old"]').text.strip(),
        "New Price": product_elem.find_element(By.XPATH, 'span[@class="price-new"]').text.strip(),
        "Tax": product_elem.find_element(By.XPATH, 'span[@class="price-tax"]').text.strip(),
    }
    products.append(product)
At the end close the browser:
driver.quit()If Selenium doesn't meet your needs, consider Pyppeteer, which offers asynchronous functionality in addition to similar features.
Data Storage
Having explored several methods of data extraction from the OpenCart demo site, let's examine various options for data storage. To provide comprehensive examples, we will consider saving data not only to CSV or JSON files, but also to a database.
Storing Data in CSV Format
There are two main libraries that can save data in CSV format: csv and pandas. The csv library was originally developed for working with files in this format, but the pandas library is a powerful library for data analysis and manipulation. It also provides convenient methods for reading and writing data in various formats, including CSV.
Import the library into your project:
import pandas as pdConvert the previously obtained product data to a DataFrame:
df = pd.DataFrame(products)Save the data in CSV file:
csv_file_path = 'products_data_pandas.csv'
df.to_csv(csv_file_path, index=False, encoding='utf-8')
You can also use this method to save data in XLSX format:
xlsx_file_path = 'products_data_pandas.xlsx'
df.to_xlsx(xlsx_file_path, index=False, encoding='utf-8')
If you still want to use the csv library, you need to install it first:
pip install csvImport the library into your python web scraper:
import csvCreate a handler for writing data line by line:
csv_file_path = 'products_data.csv'

with open(csv_file_path, mode='w', newline='', encoding='utf-8') as file:
    fieldnames = ["Image", "Title", "Link", "Description", "Old Price", "New Price", "Tax"]
    writer = csv.DictWriter(file, fieldnames=fieldnames)
Write the headers to the file:
writer.writeheader()Use a loop to write all the items to the file:
    for product in products:
        writer.writerow(product)
Choose the CSV library when you need to save data to a file and perform operations on the file itself, such as managing sheets, editing their names, or switching between them. The Pandas library can be the better choice when you don't need to work extensively with CSV files and simply want to save data quickly.
Storing Data in JSON Format
We have previously covered working with JSON files, including opening and saving them. Here, we will show a simple example of saving using the pandas library:
json_file_path = 'products_data_pandas.json'
df.to_json(json_file_path, orient='records', lines=True, force_ascii=False)
To work with JSON files more flexibly, you will need the json library, which we have already covered.
Storing Data in SQL Databases
Databases are a powerful way to store data, and Python offers excellent support for working with various database systems such as MSSQL, MySQL, and SQLite.
For this example, we'll focus on SQLite3, which is a lightweight and easy-to-use database that doesn't require server configuration and is supported on all major operating systems.
Import the library to the script:
import sqlite3Next, create a connection to the database. If the database file is missing, it will be automatically created.
db_file_path = 'products_database.db'
conn = sqlite3.connect(db_file_path)
cursor = conn.cursor()
Check if the required table exists in this database and if it does not, create it:
cursor.execute('''CREATE TABLE IF NOT EXISTS products
                (id INTEGER PRIMARY KEY AUTOINCREMENT,
                image TEXT,
                title TEXT,
                link TEXT,
                description TEXT,
                old_price TEXT,
                new_price TEXT,
                tax TEXT)''')
Execute an SQL query to insert the previously obtained data into the database:
cursor.executemany('''INSERT INTO products (image, title, link, description, old_price, new_price, tax)
                   VALUES (?, ?, ?, ?, ?, ?, ?)''', products)
Save the changes and close the connection:
conn.commit()
conn.close()
You can also use various SQL queries to process and manage this data.
Advanced Topics
To make your scripts more useful, functional, and reliable, you can also use the additional techniques we will discuss in this section.
Multithreading and Asynchronous Web Scraping
Multitasking and asynchronous processing can significantly improve the speed of your web scraping scripts. Multitasking allows your program to execute multiple tasks simultaneously, boosting overall performance. Asynchronous processing efficiently handles asynchronous tasks, such as web server requests, without blocking the execution flow.
Using asynchronous libraries like Pyppeteer can effectively process html pages with dynamic content. Multitasking can be useful for parallel data collection from multiple pages or resources simultaneously.
Let's consider both examples. First, let's implement the multitasking example using the concurrent library:
import concurrent.futures

def scrape_page(url):
    # Process the page
    pass

urls = ['url1', 'url2', 'url3']

with concurrent.futures.ThreadPoolExecutor() as executor:
    executor.map(scrape_page, urls)
Now let's look at how to implement asynchronous scraping using the Pyppeteer and asyncio libraries:
from pyppeteer import launch
import asyncio

async def scrape_page(url):
    # Process the page
    pass

async def main():
    browser = await launch()
    tasks = [scrape_page(url) for url in ['url1', 'url2', 'url3']]
    await asyncio.gather(*tasks)
    await browser.close()

asyncio.get_event_loop().run_until_complete(main())
If you want to learn more about the Pyppeteer library, you can read our other article where we looked at different examples of working with this library.
Using Proxies
Proxy servers are used to route user requests through an intermediary server. This can help to bypass restrictions and blocks, increase anonymity, and improve performance.
Using proxies is useful when scraping large amounts of data from a website with request restrictions, and also to avoid blocking your real IP address.
Most scraping libraries that allow you to make requests support working with proxies. Let's look at an example using the simplest one - the requests library:
proxies = {'http': 'http://your_proxy', 'https': 'https://your_proxy'}

url = 'https://example.com'
response = requests.get(url, proxies=proxies)
Other libraries provide similar functions for working with proxies. Therefore, regardless of which library you choose, you can make the scraping process more secure.
Problems and Solutions
Scraping can be a challenging task, often encountering various problems. In this section, we will not only explain these problems but also provide solutions to overcome them.
Error handling
When scraping large amounts of data, errors are inevitable. If an error occurs, the entire script can fail, which is undesirable. To avoid this, it's common to use try...except blocks in places where errors might occur, such as when making requests.
This allows you to not only catch the error but also customize the script's behavior based on the error type:
import requests

url = 'https://example.com'

try:
    response = requests.get(url)
    response.raise_for_status()

    # Process the page content

except requests.exceptions.HTTPError as errh:
    print(f"HTTP Error: {errh}")
except requests.exceptions.ConnectionError as errc:
    print(f"Error Connecting: {errc}")
except requests.exceptions.Timeout as errt:
    print(f"Timeout Error: {errt}")
except requests.exceptions.RequestException as err:
    print(f"Error: {err}")
By handling errors, your script can continue execution even when errors occur.
Web Scraping Challengies
Websites employ various measures to reduce the number of bots scraping data from their site. These measures include using CAPTCHAs, blocking suspicious IP addresses, and utilizing JavaScript rendering, among others.
To overcoming these challenges, you can either:
- Mimic human behavior: Make every effort to mimic the behavior of a real user to avoid detection by the website.
- Use a web scraping API: A web scraping API simplifies the process and handles these challenges for you.
Let's obtain the same data as before, but this time using the Scrape-It.Cloud web scraping API:
import requests
import json

url = "https://api.scrape-it.cloud/scrape"

payload = json.dumps({
  "extract_rules": {
    "Image": "div.image > a > img @src",
    "Title": "h4",
    "Link": "h4 > a @href",
    "Description": "p",
    "Old Price": "span.price-old",
    "New Price": "span.price-new",
    "Tax": "span.price-tax"
  },
  "wait": 0,
  "screenshot": True,
  "block_resources": False,
  "url": "https://demo.opencart.com/"
})

headers = {
  'x-api-key': 'YOUR-API-KEY',
  'Content-Type': 'application/json'
}

response = requests.request("POST", url, headers=headers, data=payload)
print(response.text)
As a result, you will get the same data, but you will completely avoid the risk of being blocked and you will not need to connect proxies or services to solve CAPTCHAs, since these problems will be taken care of by the API.
Changes in HTML Document Structure
The ever-changing structure of websites poses a significant challenge for data extraction. This can be due to various reasons, such as bot protection, site improvements, or SEO optimization.
Unfortunately, there are only two ways to overcome this challenge:
- Constant monitoring and python code adaptation. This involves regularly checking the website for changes and updating your code accordingly.
- Using specialized web scraping APIs developed for the desired website. These APIs provide ready-to-use data in a predefined format, regardless of changes on the website.
The latter option is more efficient and reliable, making it the preferred choice for most data extraction tasks.
Conclusion
In this article, we took a step-by-step look at web scraping in Python, from setting up your own programming environment and basic examples to more advanced techniques that include multiprocessing and asynchronous scraping.
Additionally, in this tutorial, we covered the main libraries for scraping, looked at different situations in which one library or another might be suitable, and also looked at the difficulties you might encounter and how to solve them.
Regardless of what you might need in the future - data parsing, processing dynamic web pages, or saving data in any of the popular formats, we tried to cover everything and provide examples for each option.
