Learning PHP web scraping is beneficial in various fields. Whether you are a marketer or an SEO researcher, accessing up-to-date data is always essential, and manual data collection can be time-consuming. That's where web scraping comes in. It can be helpful in many areas, from search engine optimization and SEO marketing to big data analysis.
Why Scrape with PHP
PHP is a powerful object-oriented programming language designed specifically for web development. Thanks to its user-friendly syntax, it's easy to learn and understand, even for beginners. PHP is not only user-friendly, but it also has exceptional performance, allowing PHP scripts to execute quickly and efficiently.
The strong support from the PHP community ensures you have access to plenty of resources, tutorials, and forums where you can get guidance and share knowledge. Overall, PHP offers the perfect combination of simplicity, speed, and versatility, making it an excellent programming language for web scraping.
Setting up the Environment for Web Scraping with PHP
To create a PHP scraper, we need to set up PHP and download the libraries we will include later in our projects. However, there are two options on how we can do this. You can manually download all the libraries and configure the initialization file or automate it using Composer.
Since we aim to simplify script creation as much as possible and show you how to do it, we will install Composer and explain how to use it.
Installing the components
To get started, download PHP from the official website. If you have Windows, download the latest stable version as a zip archive. Then unzip it in a convenient place to remember, such as the "PHP" folder on your C drive.
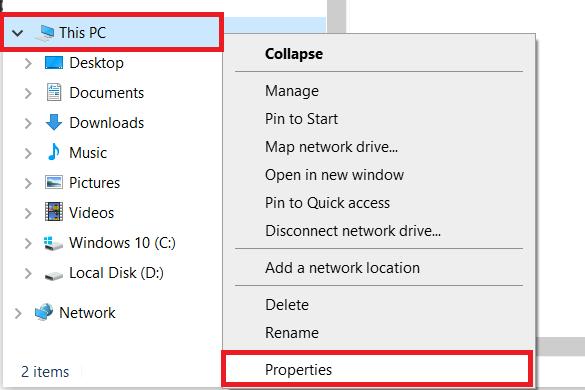
If you are using Windows, you need to set the path to the PHP files in your system. To do this, open any folder on your computer and go to the system settings (right-click on this PC and go to properties).
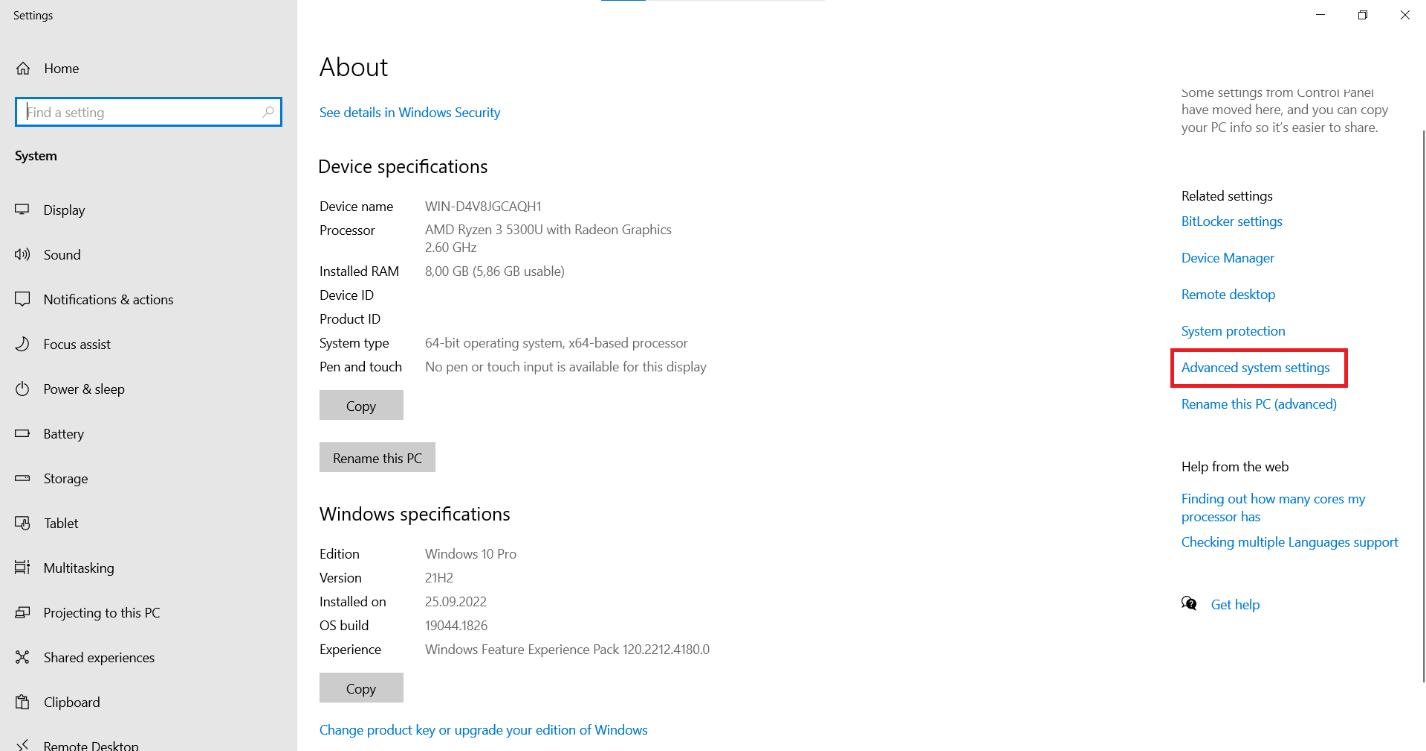
Find the "Advanced system settings" option on the page and click on it.
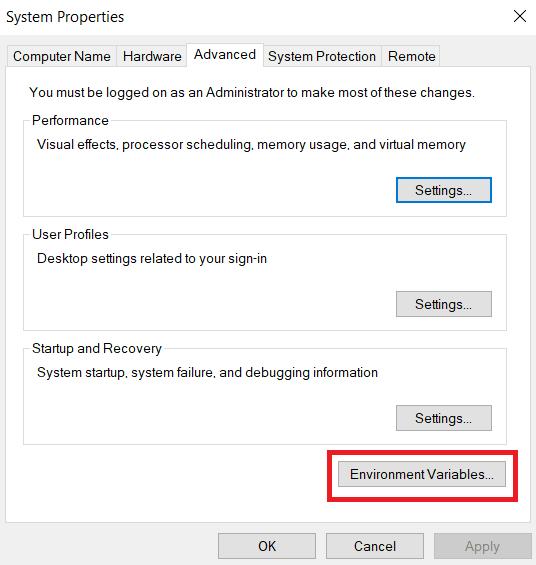
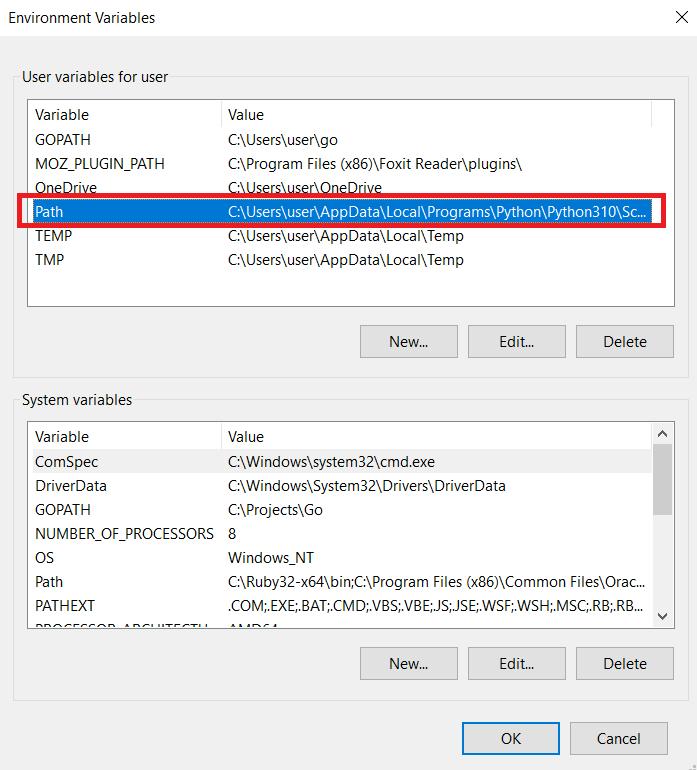
On the "Advanced" tab, look for the "Environment Variables" button and click on it.
In the "User variables for user" section, find the "Path" variable and click on the "Edit" button.
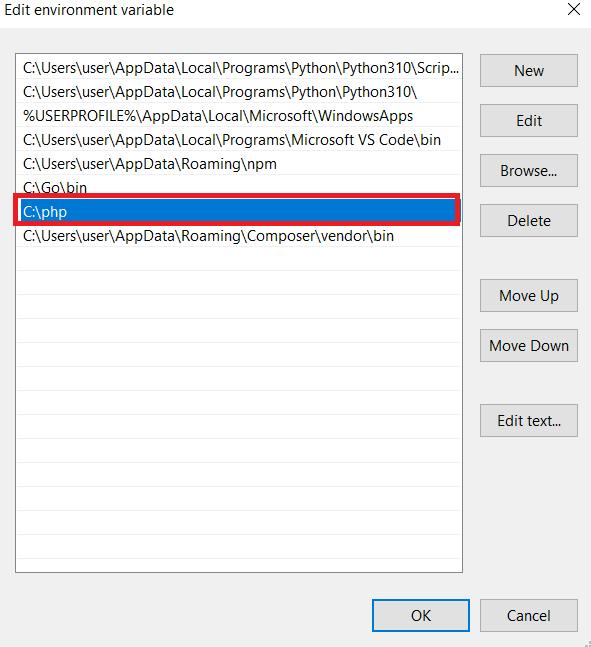
A new window will open where you can edit the value of the "Path" variable. Add the path to the PHP files at the end of the existing value. Click on the "OK" button to save the changes. If you still have questions, you can read the documentation.
Now let's install Composer, a dependency manager for PHP that simplifies managing and installing third-party libraries in your project. You can download all packages from github.com, but based on our experience, Composer is more convenient.
To start, go to the official website and download Composer. Then, follow the instructions in the installation file. You will also need to specify the path where PHP is located, so make sure it is correctly set.
In the root directory of your project, create a new file called composer.json. This file will contain information about the dependencies of your project. We have prepared a single file that includes all the libraries used in today's tutorial so you can copy our settings.
{
    "require": {
        "fabpot/goutte": "^4.0",
        "facebook/webdriver": "^1.1",
        "guzzlehttp/guzzle": "^7.7",
        "imangazaliev/didom": "^2.0",
        "j4mie/idiorm": "^1.5",
        "jaeger/querylist": "^4.2",
        "kriswallsmith/buzz": "^0.15.0",
        "nategood/httpful": "^0.3.2",
        "php-webdriver/webdriver": "^1.1",
        "querypath/querypath": "^3.0",
        "sunra/php-simple-html-dom-parser": "^1.5",
        "symfony/browser-kit": "^6.3",
        "symfony/dom-crawler": "^6.3"
    },

    "config": {
        "platform": {
            "php": "8.2.7"
        },
        "preferred-install": {
            "*": "dist"
        },
        "minimum-stability": "stable",
        "prefer-stable": true,
        "sort-packages": true
    }
}
To begin, navigate to the directory that contains the composer.json file in the command line, and run the command:
composer install The composer will download the specified dependencies and install them in the vendor directory of your project.
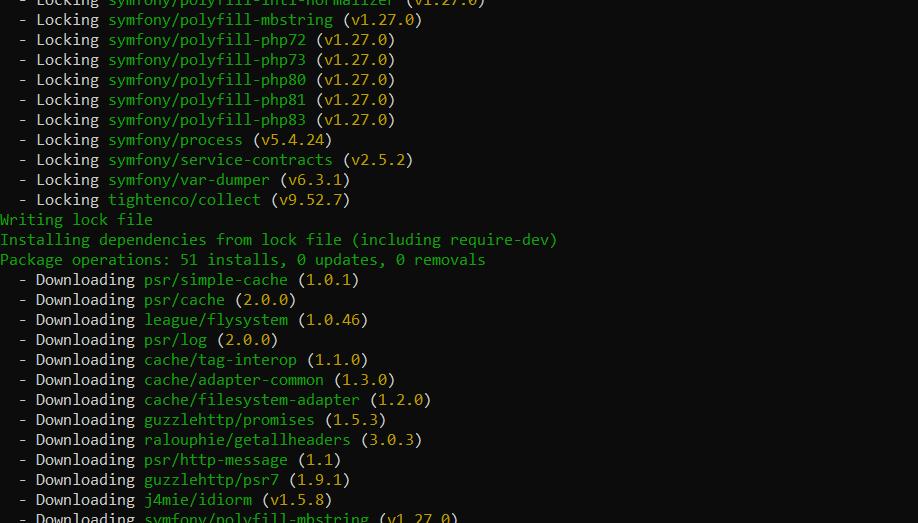
You can now import these libraries into your project using one command in the file with your code.
require 'vendor/autoload.php';Now you can use classes from the installed libraries simply by calling them in your code.
Page Analysis
Now that we have prepared the environment and set up all the components let's analyze the web page we will scrape. As an example, we will use this demo website. Go to the website and open the developer console (F12 or right-click and go to Inspect).
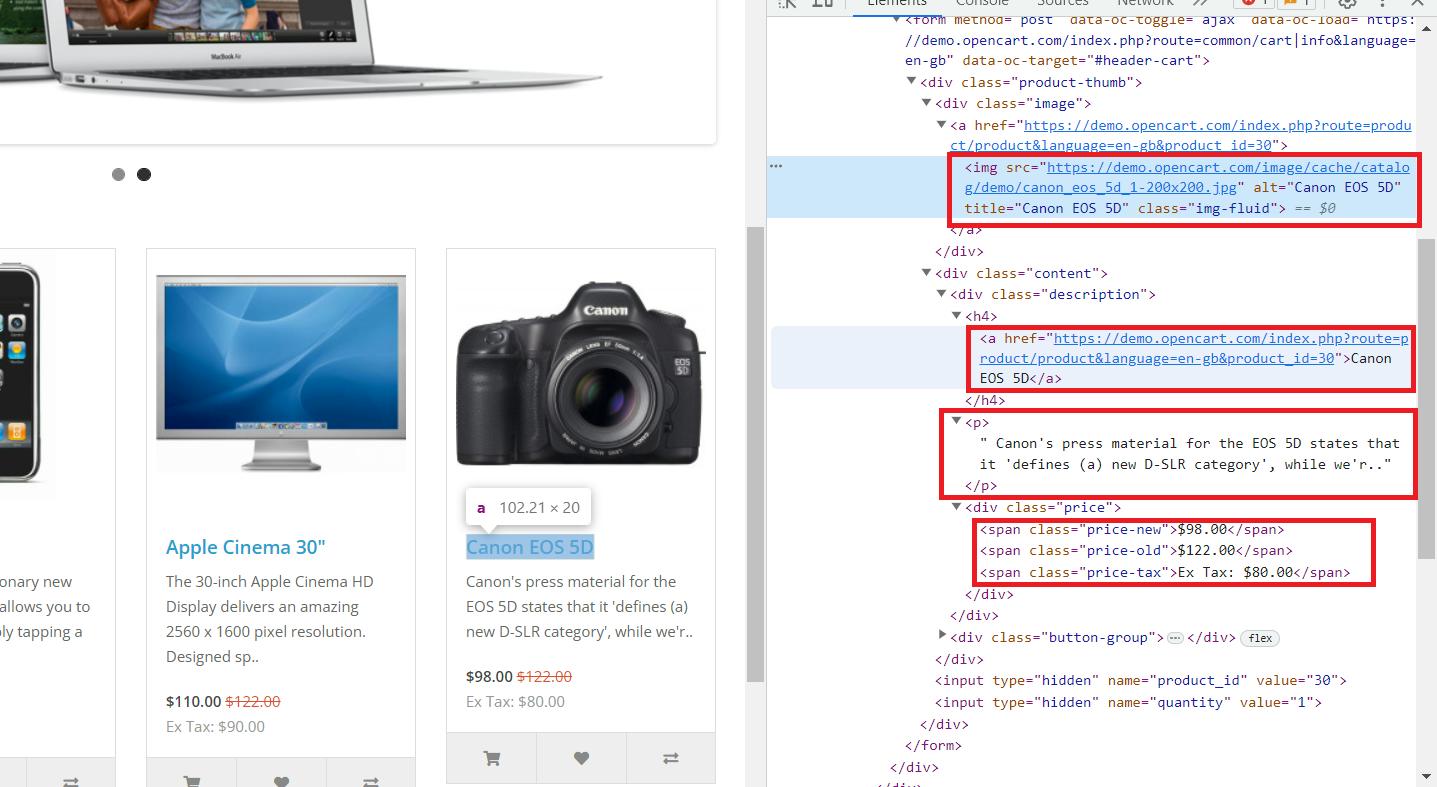
Here, we can see that all the necessary data is stored in the parent tag "div" with the class name "col," which contains all the products on the page. It includes the following information:
- The "img" tag holds the link to the product image in the "src" attribute.
- The "a" tag contains the product link in the "href" attribute.
- The "h4" tag contains the product title.
- The "p" tag contains the product description.
- Prices are stored in the "span" tag with various classes:
5.1. "Price-old" for the original price.
5.2. "Price-new" for the discounted price.
5.3. "Price-tax" for the tax.
Now that we know where the information we need is stored, we can start scraping.
Effortlessly extract Google Maps data – business types, phone numbers, addresses, websites, emails, ratings, review counts, and more. No coding needed! Download…
Google SERP Scraper is the perfect tool for any digital marketer looking to quickly and accurately collect data from Google search engine results. With no coding…
Top 10 Best PHP Web Scraping Libraries
There are so many libraries in PHP that it is challenging to cover all of them comprehensively. However, we have selected the most popular and commonly used ones and will now look at each.
Guzzle
We begin our collection with the Guzzle Library. The only thing this library can do is handle requests, but it does it exceptionally well.
Pros and Cons of Library
As mentioned before, Guzzle is a library for making requests. While it can fetch the entire page's code, it cannot process and extract the required data. However, our list also has libraries that are excellent for parsing but cannot make queries. Therefore, for scraping, Guzzle is essential.
Example of Use
Let's create a new file with the extension *.php and import our libraries. We've used this command before when we installed the PHP web scraping libraries.
<?php
require 'vendor/autoload.php';
// Here will be code
?>
Now we can create the Guzzle client.
use GuzzleHttp\Client;
$client = new Client();
However, many people encounter SSL certificate issues. If you work in a local development environment, you can temporarily disable SSL certificate verification to continue your work. This is not recommended in a production environment, but it can be a temporary solution for development and testing purposes.
$client = new Client(['verify' => false]);Now specify the URL of the page we will scrape.
$url = 'https://demo.opencart.com/';Now, all we have left is to get a request to the target website and display the result on the screen. However, errors often occur at this stage, so we will enclose this block of code in a try...catch() statement to handle any potential issues without the script stopping.
try {
    $response = $client->request('GET', $url);
    $body = $response->getBody()->getContents();
    echo $body;
} catch (Exception $e) {
    echo 'Error: ' . $e->getMessage();
We could retrieve data from this page using regular expressions, but this method wouldn't be easy because we need a substantial amount of data. Full code:
<?php
require 'vendor/autoload.php';
use GuzzleHttp\Client;
$client = new Client(['verify' => false]);
$url = 'https://demo.opencart.com/';
try {
    $response = $client->request('GET', $url);
    $body = $response->getBody()->getContents();
    echo $body;
} catch (Exception $e) {
    echo 'Error: ' . $e->getMessage();
}
?>
Now let's move on to the next library.
HTTPful
HTTPful is another functional and useful query library. It supports all requests, including POST, GET, DELETE, and PUT.
Pros and Cons of Library
The library is simple and easy to use but has a smaller community than Guzzle. Unfortunately, it has less functionality, and despite its simplicity, it is less popular. In addition, it has not been updated for quite a long time, so there may be problems when using it.
Example of Use
Given that this is a query library, we will give an extra small example of how to do a query because we would have to use another library for parsing:
<?php
require 'vendor/autoload.php';
use Httpful\Request;
$response = Request::get('https://demo.opencart.com/')->send();
$html = $response->body;
?>
So, you can use it in your scraping projects, but we recommend you use something else.
Symfony
Symfony is a framework that includes many components for scraping. It supports a variety of ways to process HTML documents and run queries.
Pros and Cons of Library
Symfony allows you to extract any data from an HTML structure and use both CSS selectors and XPath. Regardless of the size of the page, it performs the processing rather quickly.
However, although it can be used as a standalone scraping tool, Symfony is a very large and heavy framework. For this reason, it is not usual to use the entire framework but only a particular component.
Example of Use
So, let’s use its Crawler to process pages and the Guzzle library we have already discussed to make requests. We won't review it again and see how to create a client and execute a query.
Add use, which says we will use the Symfony library's crawler.
use Symfony\Component\DomCrawler\Crawler;Next, enhance the code we wrote in the try{...} block. We will process the request and retrieve all the elements with the class ".col".
    $body = $response->getBody()->getContents();
    $crawler->addHtmlContent($body);
    $elements = $crawler->filter('.col');
Now all we have to do is go through each item collected and select the information we want. To do this, we use the XPath of the elements we considered when we analyzed the page.
However, you may have noticed that not all items have the old price. Therefore, since items with the class ".price-old" may not exist, let's show this in the script and use "-" instead of price.
    foreach ($elements as $element) {
        $image = $crawler->filterXPath('.//img', $element)->attr('src');
        $title = $crawler->filterXPath('.//h4', $element)->text();
        $link = $crawler->filterXPath('.//h4/a', $element)->attr('href');
        $desc = $crawler->filterXPath('.//p', $element)->text();
        $old_p_element = $crawler->filterXPath('.//span.price-old', $element);
        $old_p = $old_p_element->count() ? $old_p_element->text() : '-';
        $new_p = $crawler->filterXPath('.//span.price-new', $element)->text();
        $tax = $crawler->filterXPath('.//span.price-tax', $element)->text();
  // Here will be code
    }
And finally, all we have to do is to display all the collected data on the screen:
        echo 'Image: ' . $image . "\n";
        echo 'Title: ' . $title . "\n";
        echo 'Link: ' . $link . "\n";
        echo 'Description: ' . $desc . "\n";
        echo 'Old Price: ' . $old_p . "\n";
        echo 'New Price: ' . $new_p . "\n";
        echo 'Tax: ' . $tax . "\n";
        echo "\n";
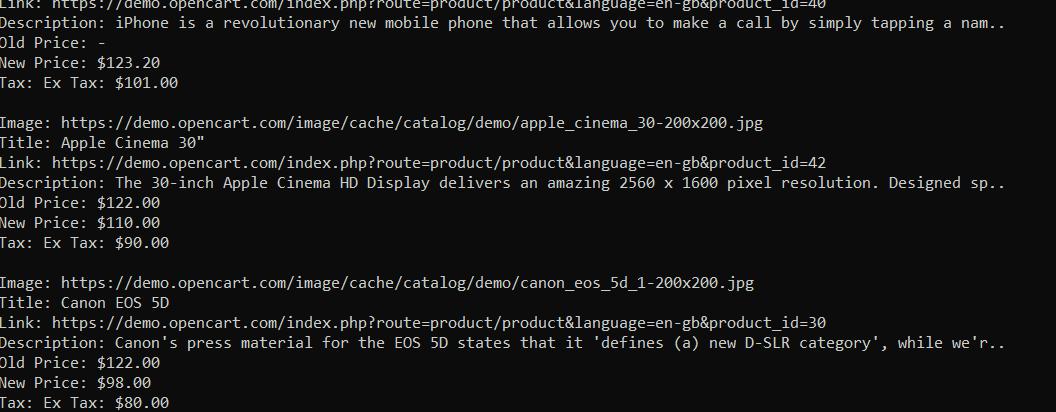
Thus, we got all the data into the console:
If you are interested in the final code or if you lost us during the tutorial, here is the complete script:
<?php
require 'vendor/autoload.php';
use GuzzleHttp\Client;
use Symfony\Component\DomCrawler\Crawler;
$client = new Client([
    'verify' => false
]);
$crawler = new Crawler();
$url = 'https://demo.opencart.com/';
try {
    $response = $client->request('GET', $url);
    $body = $response->getBody()->getContents();
    $crawler->addHtmlContent($body);
    $elements = $crawler->filter('.col');
    foreach ($elements as $element) {
        $image = $crawler->filterXPath('.//img', $element)->attr('src');
        $title = $crawler->filterXPath('.//h4', $element)->text();
        $link = $crawler->filterXPath('.//h4/a', $element)->attr('href');
        $desc = $crawler->filterXPath('.//p', $element)->text();
        $old_p_element = $crawler->filterXPath('.//span.price-old', $element);
        $old_p = $old_p_element->count() ? $old_p_element->text() : '-';
        $new_p = $crawler->filterXPath('.//span.price-new', $element)->text();
        $tax = $crawler->filterXPath('.//span.price-tax', $element)->text();

        echo 'Image: ' . $image . "\n";
        echo 'Title: ' . $title . "\n";
        echo 'Link: ' . $link . "\n";
        echo 'Description: ' . $desc . "\n";
        echo 'Old Price: ' . $old_p . "\n";
        echo 'New Price: ' . $new_p . "\n";
        echo 'Tax: ' . $tax . "\n";
        echo "\n";
    }

} catch (Exception $e) {
    echo 'Error: ' . $e->getMessage();
}
?>
If you want to use only the Symfony framework, you can use its Panther component. We won’t go through the Panther usage step-by-step, but we will give you an example, that gets the same data:
<?php
require 'vendor/autoload.php';
use Symfony\Component\Panther\Panther;

$client = Panther::createChromeClient();
$crawler = $client->request('GET', 'https://demo.opencart.com/');
$elements = $crawler->filter('.col');
$elements->each(function ($element) {
    $image = $element->filter('img')->attr('src');
    $title = $element->filter('h4')->text();
    $link = $element->filter('h4 > a')->attr('href');
    $desc = $element->filter('p')->text();
    $old_p_element = $element->filter('span.price-old');
    $old_p = $old_p_element->count() > 0 ? $old_p_element->text() : '-';
    $new_p = $element->filter('span.price-new')->text();
    $tax = $element->filter('span.price-tax')->text();

    echo 'Image: ' . $image . "\n";
    echo 'Title: ' . $title . "\n";
    echo 'Link: ' . $link . "\n";
    echo 'Description: ' . $desc . "\n";
    echo 'Old Price: ' . $old_p . "\n";
    echo 'New Price: ' . $new_p . "\n";
    echo 'Tax: ' . $tax . "\n";
    echo "\n";
});

$client->quit();
?>
Let's move on to a library that can replace the two discussed.
Goutte
Goutte is a PHP library that provides a convenient way to scrape web pages. It is based on Symfony components such as DomCrawler and BrowserKit and uses Guzzle as an HTTP client. Therefore, it combines the advantages of both these libraries.
Pros and Cons of Library
Goutte has simple functionality, making scraping web pages easy for beginners. It also supports both CSS selectors and XPath.
Although Goutte is a powerful and convenient library for web scraping in PHP, it has some limitations and disadvantages. It lacks built-in support for executing JavaScript on the page. If the target page heavily relies on JavaScript for display or data loading, Goutte may not be the best choice.
Example of Use
Considering that the Guotte library is based on Guzzle and Symfony, its usage is like what we have already looked at. Here we also use methods like filter() and attr() or text() to extract the required data, such as images, titles, or links:
<?php
require 'vendor/autoload.php';
$guzzleClient = new \GuzzleHttp\Client([
    'verify' => false
]);

$client = new \Goutte\Client();
$client->setClient($guzzleClient);

try {
    $crawler = $client->request('GET', 'https://demo.opencart.com/');
    $elements = $crawler->filter('.col');
    $elements->each(function ($element) {
        $image = $element->filter('img')->attr('src');
        $title = $element->filter('h4')->text();
        $link = $element->filter('h4 > a')->attr('href');
        $desc = $element->filter('p')->text();
        $old_p_element = $element->filter('span.price-old');
        $old_p = $old_p_element->count() ? $old_p_element->text() : '-';
        $new_p = $element->filter('span.price-new')->text();
        $tax = $element->filter('span.price-tax')->text();

        echo 'Image: ' . $image . "\n";
        echo 'Title: ' . $title . "\n";
        echo 'Link: ' . $link . "\n";
        echo 'Description: ' . $desc . "\n";
        echo 'Old Price: ' . $old_p . "\n";
        echo 'New Price: ' . $new_p . "\n";
        echo 'Tax: ' . $tax . "\n";
        echo "\n";
    });
} catch (Exception $e) {
    echo 'Error: ' . $e->getMessage();
}
?>
So, we got the same data but with another library:
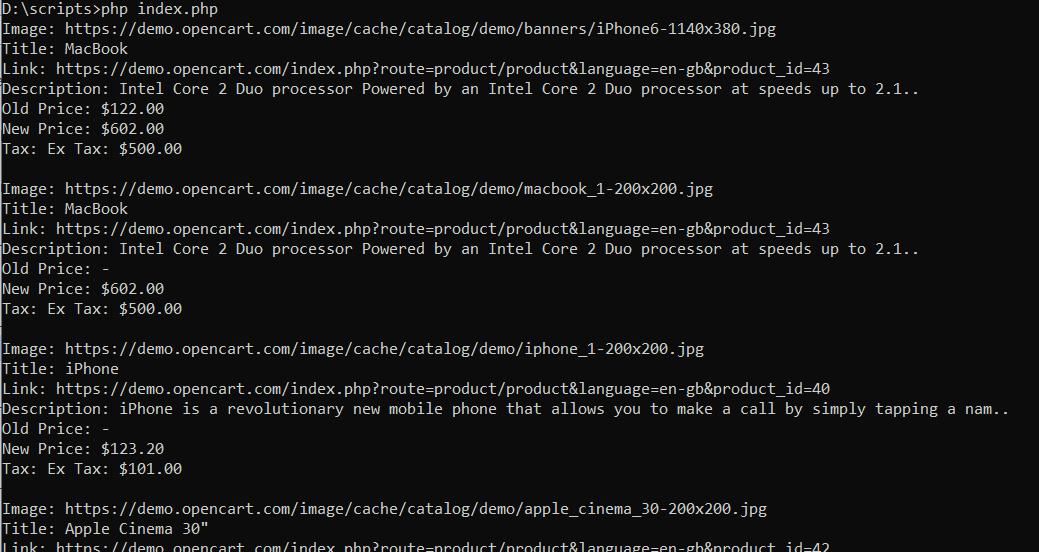
As you can see, Goutte is a quite convenient PHP web scraping library.
Scrape-It.Cloud API
Scrape-It.Cloud API is a special interface that we developed to simplify the scraping process. When scraping data, developers often face several challenges, such as JavaScript rendering, captcha, blocks, etc. However, using our API will allow you to bypass these problems and focus on processing the data you've already received.
Gain instant access to a wealth of business data on Google Maps, effortlessly extracting vital information like location, operating hours, reviews, and more in HTML…
Get fast, real-time access to structured Google search results with our SERP API. No blocks or CAPTCHAs - ever. Streamline your development process without worrying…
Pros and Cons of Library
As mentioned, our web scraping API will help you avoid many challenges when developing your scraper. Additionally, it will save you money. We have already discussed the top 10 proxy providers and compared the cost of purchasing rotating proxies and our subscription.
Besides, if you need to get some data and do not want to develop a scraper, you can use our no-code scrapers for the most popular sites. If you have doubts and want to try, sign up on our site and get free credits as part of the trial version.
Example of Use
To use the API, we need to make a request. We will use the Guzzle library, which we have already discussed. Let's connect it and set the API link.
require 'vendor/autoload.php';
use GuzzleHttp\Client;
$apiUrl = 'https://api.scrape-it.cloud/scrape';
Now, we need to create a request with two parts - the request headers and the request body. First, set up the headers:
$headers = [
    'x-api-key' => 'YOUR-API-KEY',
    'Content-Type' => 'application/json',
];
You must replace "YOUR-API-KEY" with your unique key, which you can find after signing up on our site in your account.
Then, we need to set the request's body to tell the API what data we want. Here you can specify the data extraction rules, the proxy and the type of proxy you want to use, the script to be extracted, the link to the resource, and much more. You can find a complete list of parameters in our documentation.
$data = [
    'extract_rules' => [
        'Image' => 'img @src',
        'Title' => 'h4',
        'Link' => 'h4 > a @href',
        'Description' => 'p',
        'Old Price' => 'span.price-old',
        'New Price' => 'span.price-new',
        'Tax' => 'span.price-tax',
    ],
    'wait' => 0,
    'screenshot' => true,
    'block_resources' => false,
    'url' => 'https://demo.opencart.com/',
];
We used extraction rules to get only the desired data. The API returns the response in JSON format, which we can use to extract only the extraction rules from the response.
$data = json_decode($response->getBody(), true);
if ($data['status'] === 'ok') {
    $extractionData = $data['scrapingResult']['extractedData'];
    foreach ($extractionData as $key => $value) {
        echo $key . ": " . json_encode($value) . "\n\n";
    }
} else {
    echo "An error occurred: " . $data['message'];
}
We will get the desired information by running the script we've created. The best part is that this script will work regardless of the website you want to scrape. All you need to do is change the extraction rules and provide the link to the target resource.
Full code:
<?php
require 'vendor/autoload.php';
use GuzzleHttp\Client;

$apiUrl = 'https://api.scrape-it.cloud/scrape';

$headers = [
    'x-api-key' => 'YOUR-API-KEY',
    'Content-Type' => 'application/json',
];

$data = [
    'extract_rules' => [
        'Image' => 'img @src',
        'Title' => 'h4',
        'Link' => 'h4 > a @href',
        'Description' => 'p',
        'Old Price' => 'span.price-old',
        'New Price' => 'span.price-new',
        'Tax' => 'span.price-tax',
    ],
    'wait' => 0,
    'screenshot' => true,
    'block_resources' => false,
    'url' => 'https://demo.opencart.com/',
];

$client = new Client(['verify' => false]);
$response = $client->post($apiUrl, [
    'headers' => $headers,
    'json' => $data,
]);
$data = json_decode($response->getBody(), true);

if ($data['status'] === 'ok') {
    $extractionData = $data['scrapingResult']['extractedData'];

    foreach ($extractionData as $key => $value) {
        echo $key . ": " . json_encode($value) . "\n\n";
    }
} else {
    echo "An error occurred: " . $data['message'];
}
?>
The result is:
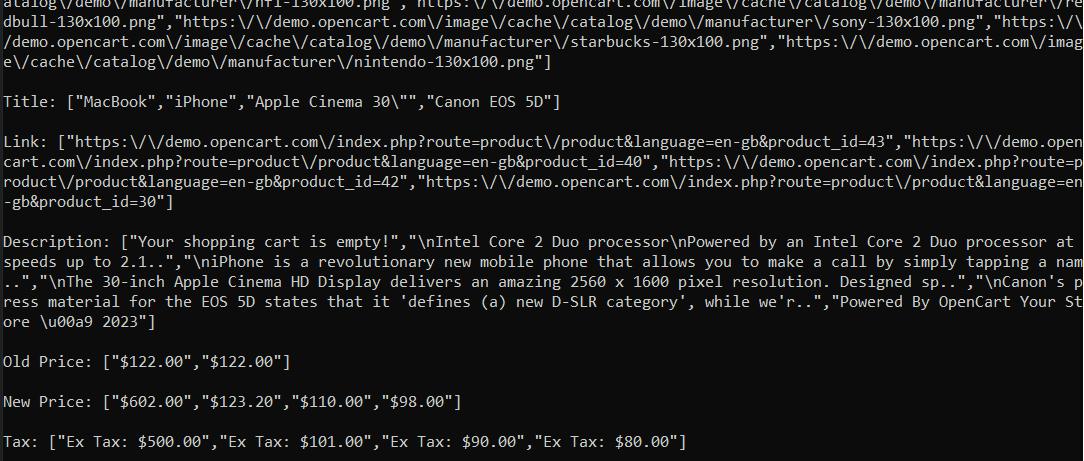
Using our web scraping API, you can get results from any site, regardless of whether it is accessible in your country or the content is dynamically generated.
Simple HTML DOM
The Simple HTML DOM library is one of the most straightforward PHP DOM libraries. It's great for beginners, has a complete scraping library, and is very easy to use.
Pros and Cons of Library
This library is very easy to use and perfect for scraping simple pages. However, you cannot collect data from dynamically generated pages. In addition, this library only allows you to use CSS selectors and does not support XPath.
Example of Use
Let's see by example that it is very easy to use. First, connect the dependencies and specify the site from which we will scrape the data.
require 'vendor/autoload.php';
use Sunra\PhpSimple\HtmlDomParser;
$html = HtmlDomParser::file_get_html('https://demo.opencart.com/');
Now find all the products using the find() function and the CSS selector.
$elements = $html->find('.col');Now let's go through all the collected elements and select the data we need. In doing so, we need to specify what we want to extract. We'll need to specify the attribute name if it is an attribute value. If we want to extract the text content of a tag, we'll use "plaintext". As before, let's display the text on the screen at once.
foreach ($elements as $element) {
    $image = $element->find('img', 0)->src;
    $title = $element->find('h4', 0)->plaintext;
    $link = $element->find('h4 > a', 0)->href;
    $desc = $element->find('p', 0)->plaintext;
    $old_p_element = $element->find('span.price-old', 0);
    $old_p = $old_p_element ? $old_p_element->plaintext : '-';
    $new_p = $element->find('span.price-new', 0)->plaintext;
    $tax = $element->find('span.price-tax', 0)->plaintext;

    echo 'Image: ' . $image . "\n";
    echo 'Title: ' . $title . "\n";
    echo 'Link: ' . $link . "\n";
    echo 'Description: ' . $desc . "\n";
    echo 'Old Price: ' . $old_p . "\n";
    echo 'New Price: ' . $new_p . "\n";
    echo 'Tax: ' . $tax . "\n";
    echo "\n";
}
After that, all we have to do is free resources and end the script.
$html->clear();Full code:
<?php
require 'vendor/autoload.php';
use Sunra\PhpSimple\HtmlDomParser;
$html = HtmlDomParser::file_get_html('https://demo.opencart.com/');
$elements = $html->find('.col');

foreach ($elements as $element) {
    $image = $element->find('img', 0)->src;
    $title = $element->find('h4', 0)->plaintext;
    $link = $element->find('h4 > a', 0)->href;
    $desc = $element->find('p', 0)->plaintext;
    $old_p_element = $element->find('span.price-old', 0);
    $old_p = $old_p_element ? $old_p_element->plaintext : '-';
    $new_p = $element->find('span.price-new', 0)->plaintext;
    $tax = $element->find('span.price-tax', 0)->plaintext;

    echo 'Image: ' . $image . "\n";
    echo 'Title: ' . $title . "\n";
    echo 'Link: ' . $link . "\n";
    echo 'Description: ' . $desc . "\n";
    echo 'Old Price: ' . $old_p . "\n";
    echo 'New Price: ' . $new_p . "\n";
    echo 'Tax: ' . $tax . "\n";
    echo "\n";
}

$html->clear();
?>
The result is the same data as the previous examples but in just a few lines of code.
Selenium
We have often written about Selenium in collections for other programming languages like Python, R, Ruby, and C#. We want to discuss this library again because it is incredibly convenient. It has well-written documentation and an active community supporting it.
Pros and Cons of Library
This library has many pros and only a few cons. It has excellent community support, extensive documentation, and constant refinement and improvement.
Selenium allows you to use headless browsers to simulate real user behavior. This means you can reduce the risk of detection while scraping. Moreover, you can interact with elements on a webpage, such as filling out forms or clicking buttons.
As for the cons, it is not as popular in PHP as NodeJS or Python, and it may be challenging for beginners.
Example of Use
Now let's look at an example of using Selenium. To make it work, we need a web driver. We will use the Chrome web driver. Ensure it matches the Chrome browser's version installed on your computer. Unzip the web driver to your C drive.
You can use any web driver you prefer. For instance, you can choose Mozilla Firefox or any other supported by Selenium.
To start, add the necessary dependencies to our project.
require 'vendor/autoload.php';

use Facebook\WebDriver\Remote\DesiredCapabilities;
use Facebook\WebDriver\Remote\RemoteWebDriver;
use Facebook\WebDriver\WebDriverBy;
Now let's specify the parameters of the host on which our web driver runs. To do this, run the web driver file and see on which port it starts.

Specify these parameters in the script:
$host = 'http://localhost:9515'; Next, we need to launch a browser and go to the target resource.
$capabilities = DesiredCapabilities::chrome();
$driver = RemoteWebDriver::create($host, $capabilities);
$driver->get('https://demo.opencart.com/');
Now, we need to find the products on the webpage, go through each, and get the desired data. After that, we should display the data on the screen. We have already done this in previous examples, so we won't go into detail about this step.
$elements = $driver->findElements(WebDriverBy::cssSelector('.col'));
foreach ($elements as $element) {
    $image = $element->findElement(WebDriverBy::tagName('img'))->getAttribute('src');
    $title = $element->findElement(WebDriverBy::tagName('h4'))->getText();
    $link = $element->findElement(WebDriverBy::cssSelector('h4 > a'))->getAttribute('href');
    $desc = $element->findElement(WebDriverBy::tagName('p'))->getText();
    $old_p_element = $element->findElement(WebDriverBy::cssSelector('span.price-old'));
    $old_p = $old_p_element ? $old_p_element->getText() : '-';
    $new_p = $element->findElement(WebDriverBy::cssSelector('span.price-new'))->getText();
    $tax = $element->findElement(WebDriverBy::cssSelector('span.price-tax'))->getText();

    echo 'Image: ' . $image . "\n";
    echo 'Title: ' . $title . "\n";
    echo 'Link: ' . $link . "\n";
    echo 'Description: ' . $desc . "\n";
    echo 'Old Price: ' . $old_p . "\n";
    echo 'New Price: ' . $new_p . "\n";
    echo 'Tax: ' . $tax . "\n";
    echo "\n";
}
Selenium provides many options for finding different elements on a page. In this tutorial, we used CSS selector search and tag search.
In the end, you should close the browser.
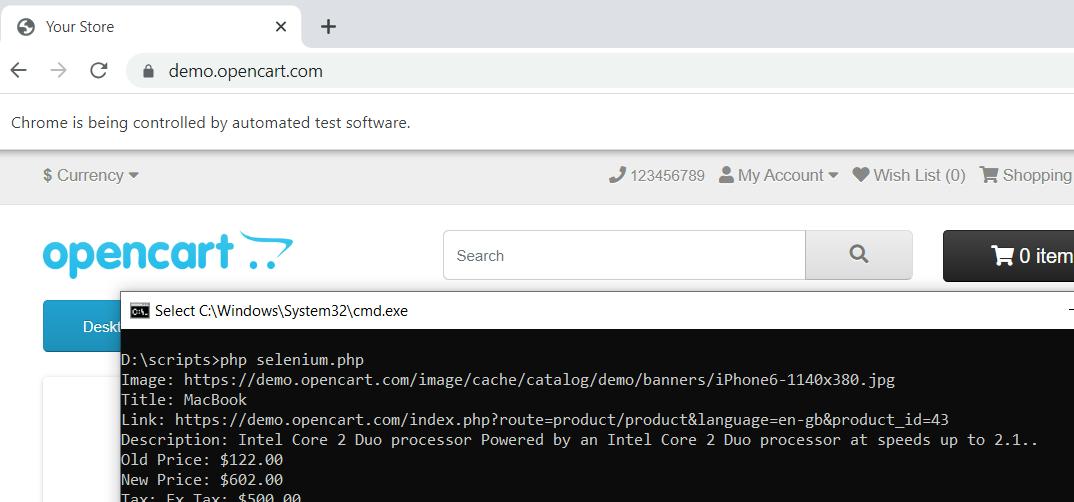
$driver->quit();If we run the script, it will launch the browser, navigate to the page, and close it after collecting the data.
If you get confused and miss something, here's the full script code:
<?php
require 'vendor/autoload.php';
use Facebook\WebDriver\Remote\DesiredCapabilities;
use Facebook\WebDriver\Remote\RemoteWebDriver;
use Facebook\WebDriver\WebDriverBy;

$host = 'http://localhost:9515';
$capabilities = DesiredCapabilities::chrome();
$driver = RemoteWebDriver::create($host, $capabilities);
$driver->get('https://demo.opencart.com/');
$elements = $driver->findElements(WebDriverBy::cssSelector('.col'));

foreach ($elements as $element) {
    $image = $element->findElement(WebDriverBy::tagName('img'))->getAttribute('src');
    $title = $element->findElement(WebDriverBy::tagName('h4'))->getText();
    $link = $element->findElement(WebDriverBy::cssSelector('h4 > a'))->getAttribute('href');
    $desc = $element->findElement(WebDriverBy::tagName('p'))->getText();
    $old_p_element = $element->findElement(WebDriverBy::cssSelector('span.price-old'));
    $old_p = $old_p_element ? $old_p_element->getText() : '-';
    $new_p = $element->findElement(WebDriverBy::cssSelector('span.price-new'))->getText();
    $tax = $element->findElement(WebDriverBy::cssSelector('span.price-tax'))->getText();

    echo 'Image: ' . $image . "\n";
    echo 'Title: ' . $title . "\n";
    echo 'Link: ' . $link . "\n";
    echo 'Description: ' . $desc . "\n";
    echo 'Old Price: ' . $old_p . "\n";
    echo 'New Price: ' . $new_p . "\n";
    echo 'Tax: ' . $tax . "\n";
    echo "\n";
}
$driver->quit();
?>
As you can see, Selenium is quite handy in PHP but a bit more complicated than other libraries.
QueryPath
QueryPath is a library for extracting data from an HTML page, filtering, and processing items.
Pros and Cons of Library
The QueryPath library is very easy to use, so it will be a good option for beginners. It also supports jQuery-like syntax for HTML/XML parsing and processing. However, it has limited functionality compared to some other libraries.
Example of Use
It has similar commands for searching as the previously discussed libraries. Thanks to its simplicity, we only need to make a request to the website and process the received data. Therefore, we won't repeat the steps we've already covered and will provide a complete example of using the library:
<?php
require 'vendor/autoload.php';
use QueryPath\Query;
$html = file_get_contents('https://demo.opencart.com/');
$qp = Query::withHTML($html);
$elements = $qp->find('.col');

foreach ($elements as $element) {
    $image = $element->find('img')->attr('src');
    $title = $element->find('h4')->text();
    $link = $element->find('h4 > a')->attr('href');
    $desc = $element->find('p')->text();
    $old_p_element = $element->find('span.price-old')->get(0);
    $old_p = $old_p_element ? $old_p_element->text() : '-';
    $new_p = $element->find('span.price-new')->text();
    $tax = $element->find('span.price-tax')->text();

    echo 'Image: ' . $image . "\n";
    echo 'Title: ' . $title . "\n";
    echo 'Link: ' . $link . "\n";
    echo 'Description: ' . $desc . "\n";
    echo 'Old Price: ' . $old_p . "\n";
    echo 'New Price: ' . $new_p . "\n";
    echo 'Tax: ' . $tax . "\n";
    echo "\n";
}
$qp->unload();
?>
So, as you can see, it has only small differences from the libraries already discussed.
QueryList
Next on our list is the QueryList library. It has more functionality than the previous library. We can also say that the principles of its use differ slightly from the already discussed libraries.
Pros and Cons of Library
QueryList is a powerful and flexible tool for extracting and processing data from HTML/XML. However, it can be complicated for beginners because of the many functions and features.
Example of Use
First, connect the dependencies and query the target site.
require 'vendor/autoload.php';
use QL\QueryList;
$html = QueryList::get('https://demo.opencart.com/')->getHtml();
Then parse the HTML code of the page.
$ql = QueryList::html($html);Let's process all the data we've got to extract the desired information. After that, we'll create a data frame and store the data in it.
$elements = $ql->find('.col')->map(function ($item) {
    $image = $item->find('img')->attr('src');
    $title = $item->find('h4')->text();
    $link = $item->find('h4 > a')->attr('href');
    $desc = $item->find('p')->text();
    $old_p = $item->find('span.price-old')->text() ?: '-';
    $new_p = $item->find('span.price-new')->text();
    $tax = $item->find('span.price-tax')->text();

    return [
        'Image' => $image,
        'Title' => $title,
        'Link' => $link,
        'Description' => $desc,
        'Old Price' => $old_p,
        'New Price' => $new_p,
        'Tax' => $tax
    ];
});
Now let's go through each element and print them on the display:
foreach ($elements as $element) {
    foreach ($element as $key => $value) {
        echo $key . ': ' . $value . "\n";
    }
    echo "\n";
}
That's it, we've got the data we need, and if you missed something, we'll give you the full code:
<?php
require 'vendor/autoload.php';
use QL\QueryList;
$html = QueryList::get('https://demo.opencart.com/')->getHtml();
$ql = QueryList::html($html);
$elements = $ql->find('.col')->map(function ($item) {
    $image = $item->find('img')->attr('src');
    $title = $item->find('h4')->text();
    $link = $item->find('h4 > a')->attr('href');
    $desc = $item->find('p')->text();
    $old_p = $item->find('span.price-old')->text() ?: '-';
    $new_p = $item->find('span.price-new')->text();
    $tax = $item->find('span.price-tax')->text();
    return [
        'Image' => $image,
        'Title' => $title,
        'Link' => $link,
        'Description' => $desc,
        'Old Price' => $old_p,
        'New Price' => $new_p,
        'Tax' => $tax
    ];
});

foreach ($elements as $element) {
    foreach ($element as $key => $value) {
        echo $key . ': ' . $value . "\n";
    }
    echo "\n";
}
?>
This library has many features and a rich set of functionalities. However, for beginners, it can be quite challenging to navigate through them.
DiDOM
The last library in our article is DiDom. It's great for extracting data from an HTML and converting it into a usable view.
Pros and Cons of Library
DiDom is a lightweight library with simple and clear functions. It also has good performance. Unfortunately, it is less popular and has a smaller support community than other libraries.
Example of Use
Connect the dependencies and make a request to the target site:
require 'vendor/autoload.php';
use DiDom\Document;
$document = new Document('https://demo.opencart.com/', true);
Find all products that have the ".col" class:
$elements = $document->find('.col');Let's go through each of them, gather the data and display it on the screen:
foreach ($elements as $element) {
    $image = $element->find('img', 0)->getAttribute('src');
    $title = $element->find('h4', 0)->text();
    $link = $element->find('h4 > a', 0)->getAttribute('href');
    $desc = $element->find('p', 0)->text();
    $old_p_element = $element->find('span.price-old', 0);
    $old_p = $old_p_element ? $old_p_element->text() : '-';
    $new_p = $element->find('span.price-new', 0)->text();
    $tax = $element->find('span.price-tax', 0)->text();

    echo 'Image: ' . $image . "\n";
    echo 'Title: ' . $title . "\n";
    echo 'Link: ' . $link . "\n";
    echo 'Description: ' . $desc . "\n";
    echo 'Old Price: ' . $old_p . "\n";
    echo 'New Price: ' . $new_p . "\n";
    echo 'Tax: ' . $tax . "\n";
    echo "\n";
}
At this point, the script is ready, and you can process the data in any way you want. Also, we attach a full code example:
<?php
require 'vendor/autoload.php';
use DiDom\Document;
$document = new Document('https://demo.opencart.com/', true);
$elements = $document->find('.col');
foreach ($elements as $element) {
    $image = $element->find('img', 0)->getAttribute('src');
    $title = $element->find('h4', 0)->text();
    $link = $element->find('h4 > a', 0)->getAttribute('href');
    $desc = $element->find('p', 0)->text();
    $old_p_element = $element->find('span.price-old', 0);
    $old_p = $old_p_element ? $old_p_element->text() : '-';
    $new_p = $element->find('span.price-new', 0)->text();
    $tax = $element->find('span.price-tax', 0)->text();

    echo 'Image: ' . $image . "\n";
    echo 'Title: ' . $title . "\n";
    echo 'Link: ' . $link . "\n";
    echo 'Description: ' . $desc . "\n";
    echo 'Old Price: ' . $old_p . "\n";
    echo 'New Price: ' . $new_p . "\n";
    echo 'Tax: ' . $tax . "\n";
    echo "\n";
}
?>
This concludes our collection of the best PHP scraping libraries. It's time to choose the best library out of all those reviewed.
The Best PHP Library for Scraping
Choosing the best web scraping PHP library depends on several factors: project goals, requirements, and your programming skills. To help you decide, we have gathered the key information discussed in the article and made a comparative table of the top 10 scraping libraries.
|
Library |
Pros |
Cons |
Scraping Dynamic Data |
Ease of Use |
|---|---|---|---|---|
|
Guzzle |
|
|
No |
Intermediate |
|
HTTPful |
|
|
No |
Beginner |
|
Symfony |
|
|
Yes |
Advanced |
|
Goutte |
|
|
No |
Beginner |
|
Scrape-It.Cloud |
|
|
Yes |
Beginner |
|
Simple HTML DOM |
|
|
No |
Beginner |
|
Selenium |
|
|
Yes |
Intermediate |
|
QueryPath |
|
|
No |
Intermediate |
|
QueryList |
|
|
Yes |
Intermediate |
|
DiDom |
|
|
No |
Beginner |
This will help you find the best PHP scraping library that will be perfect for you to reach your goals.
Conclusion and Takeaways
In this article, we have delved into setting up a PHP programming environment and explored the possibilities of automating library integration and updates. We have also introduced the top 10 web scraping libraries to help you with various options for your scraping projects.
However, if you find yourself in difficulty about selecting the best library, we have compared all the libraries we've considered. But if you still don't know what to choose, you can try our web scraping API. It not only simplifies the data collection process but also helps navigate through potential challenges. With its capabilities, you can automate data-gathering tasks and overcome all the difficulties.
